


Ray-tracing reflections in Cyberpunk and DLSS 2.0
We are introducing a new testing methodology for graphics cards. One of the reviewed cards will be the GeForce RTX 3070 and we have an interesting one: Aorus GeForce RTX 3070 Master 8G with six video outputs. Before the review comes out, we’ve use it for a visual comparison to see the impact of ray tracing and how the different DLSS settings in the latest Cyberpunk 2077 patch will affect the quality of the game graphics.
Gigabyte AORUS GeForce RTX 3070 Master 8G
AORUS GeForce RTX 3070 Master 8G is a non-reference version of GeForce RTX 3070 using a cooler with three axial fans, the center one of which is contra-rotating and mounted a little lower into the cooler. The blades of the edge fans partially overlap it, so the whole length of the card is used more efficiently for the cooling: the area of the heatsink that is not having air forced through it directly has been reduced by this measure. At the end of the card there is a pass-through opening, similar to how the cooler is opened for airflow on the Founders Edition variant. Roughly 60% of the rear fan output passes through card into the space above the PCI Express slots, which should improve the overall cooling.
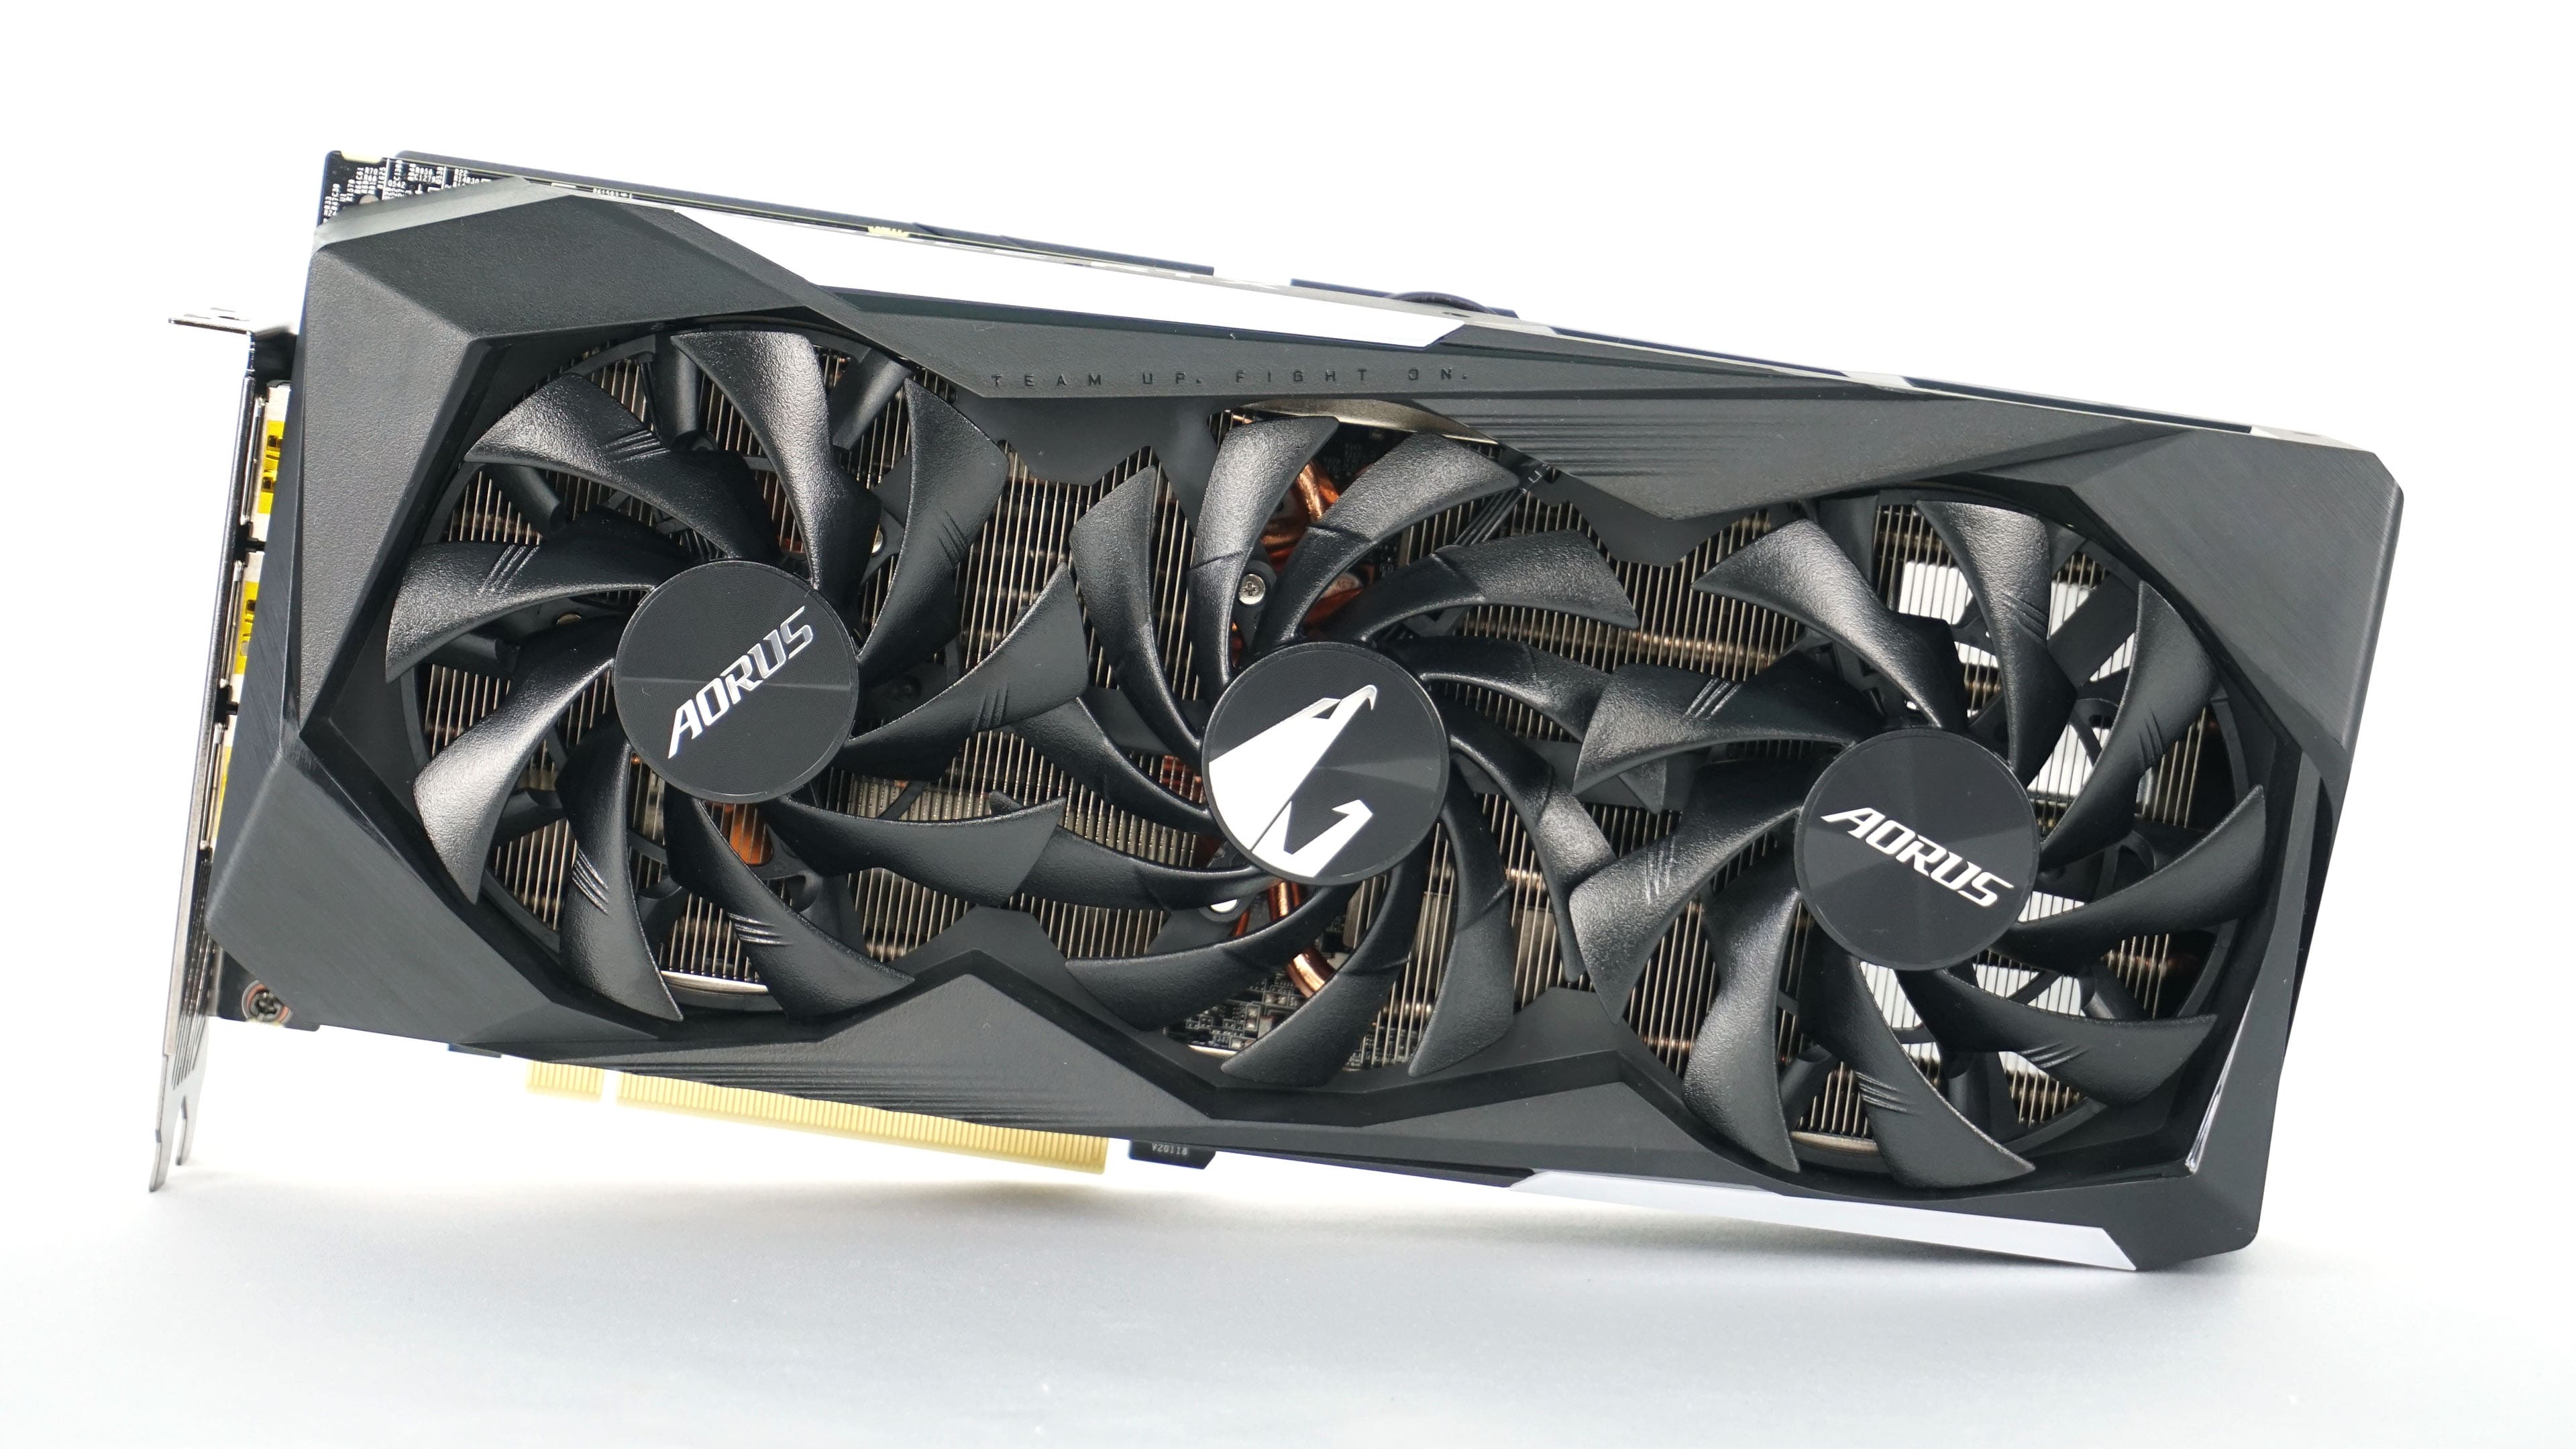
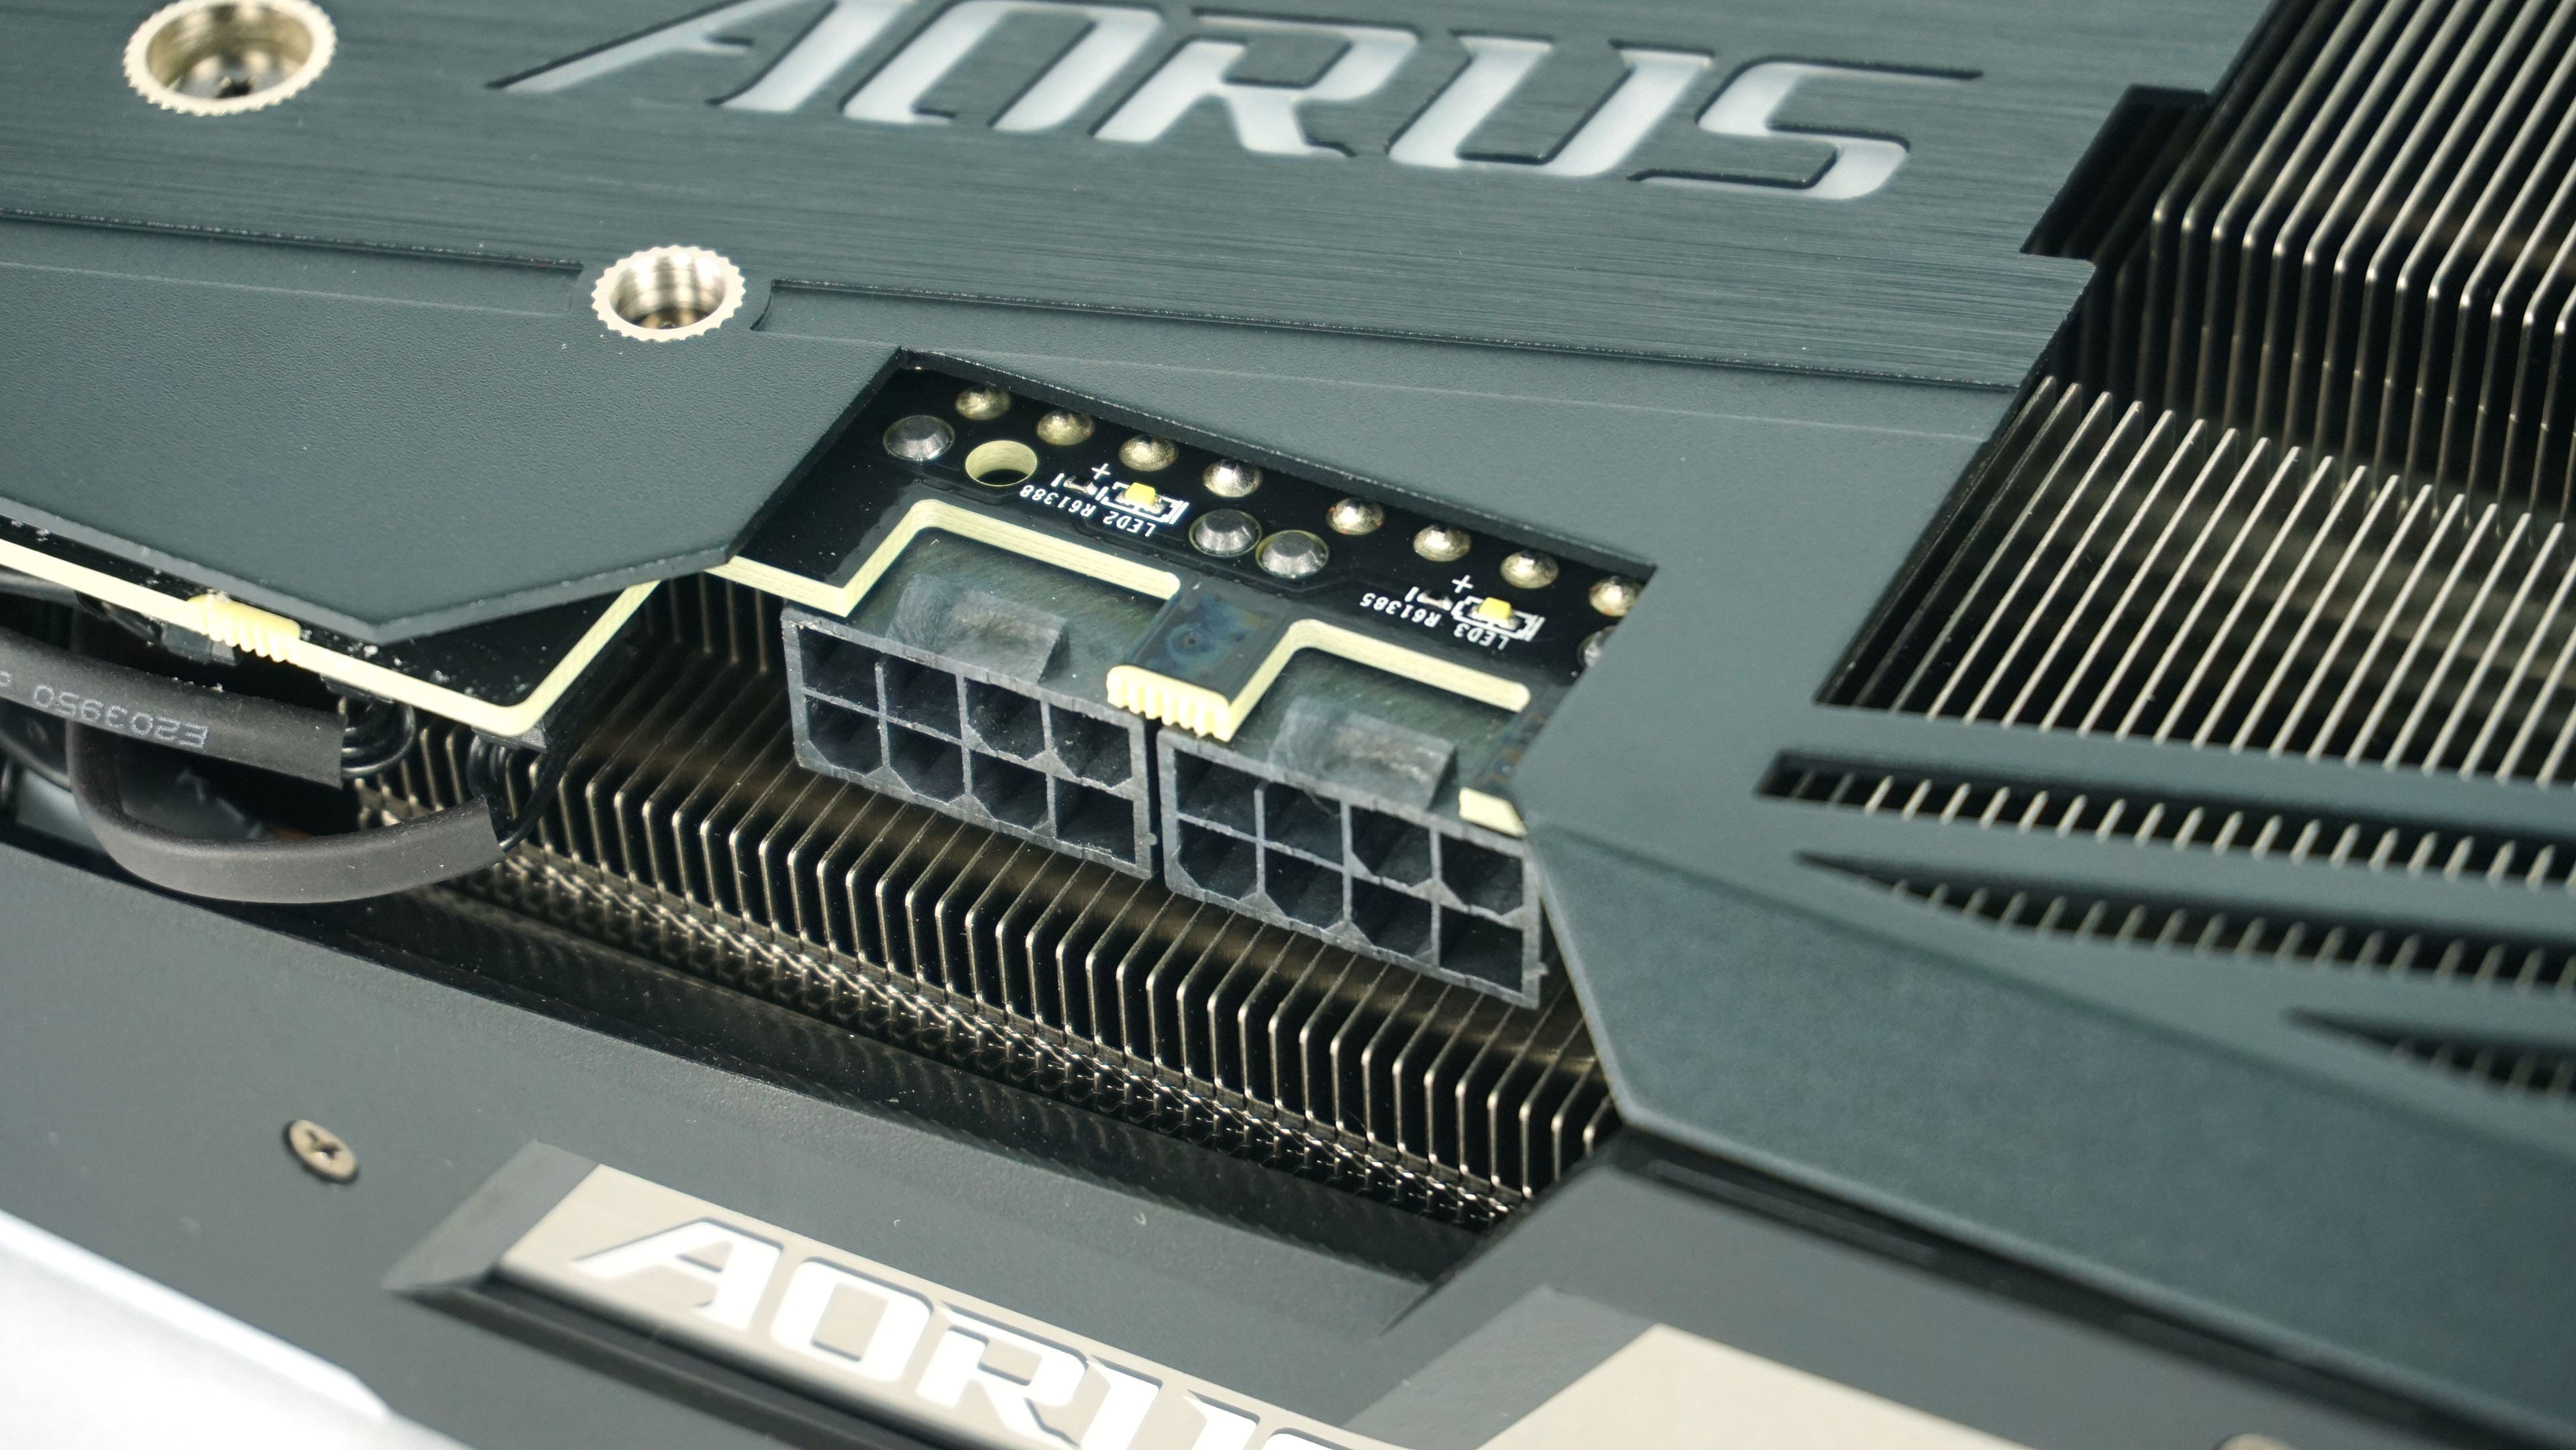
Compared with Nvidia’s Founders Edition, you also get RGB illumination (with RGB Fusion 2.0 technology), in addition to the three-fan cooler. And also, Gigabyte uses the good old standard power supply via two 8-pin connectors, so you don’t have to deal with an adaptor and can simply connect any sufficient power supply. Both connectors have LED indicators for power problems signaling.
The card runs the GPU factory overclocked, with a 1845 MHz boost, while the standard reference value is 1725 MHz (a 7% increase). The memory is standard GDDR6 with a capacity of 14.0 GHz, but as we have already mentioned, the outputs are special: the card has two rows of video ports – the usual three DisplayPorts 1.4a are in the upper one. The card supports four displays simultaneously, but has six ports, which gives more freedom in setting up monitors, TVs or VR headsets.
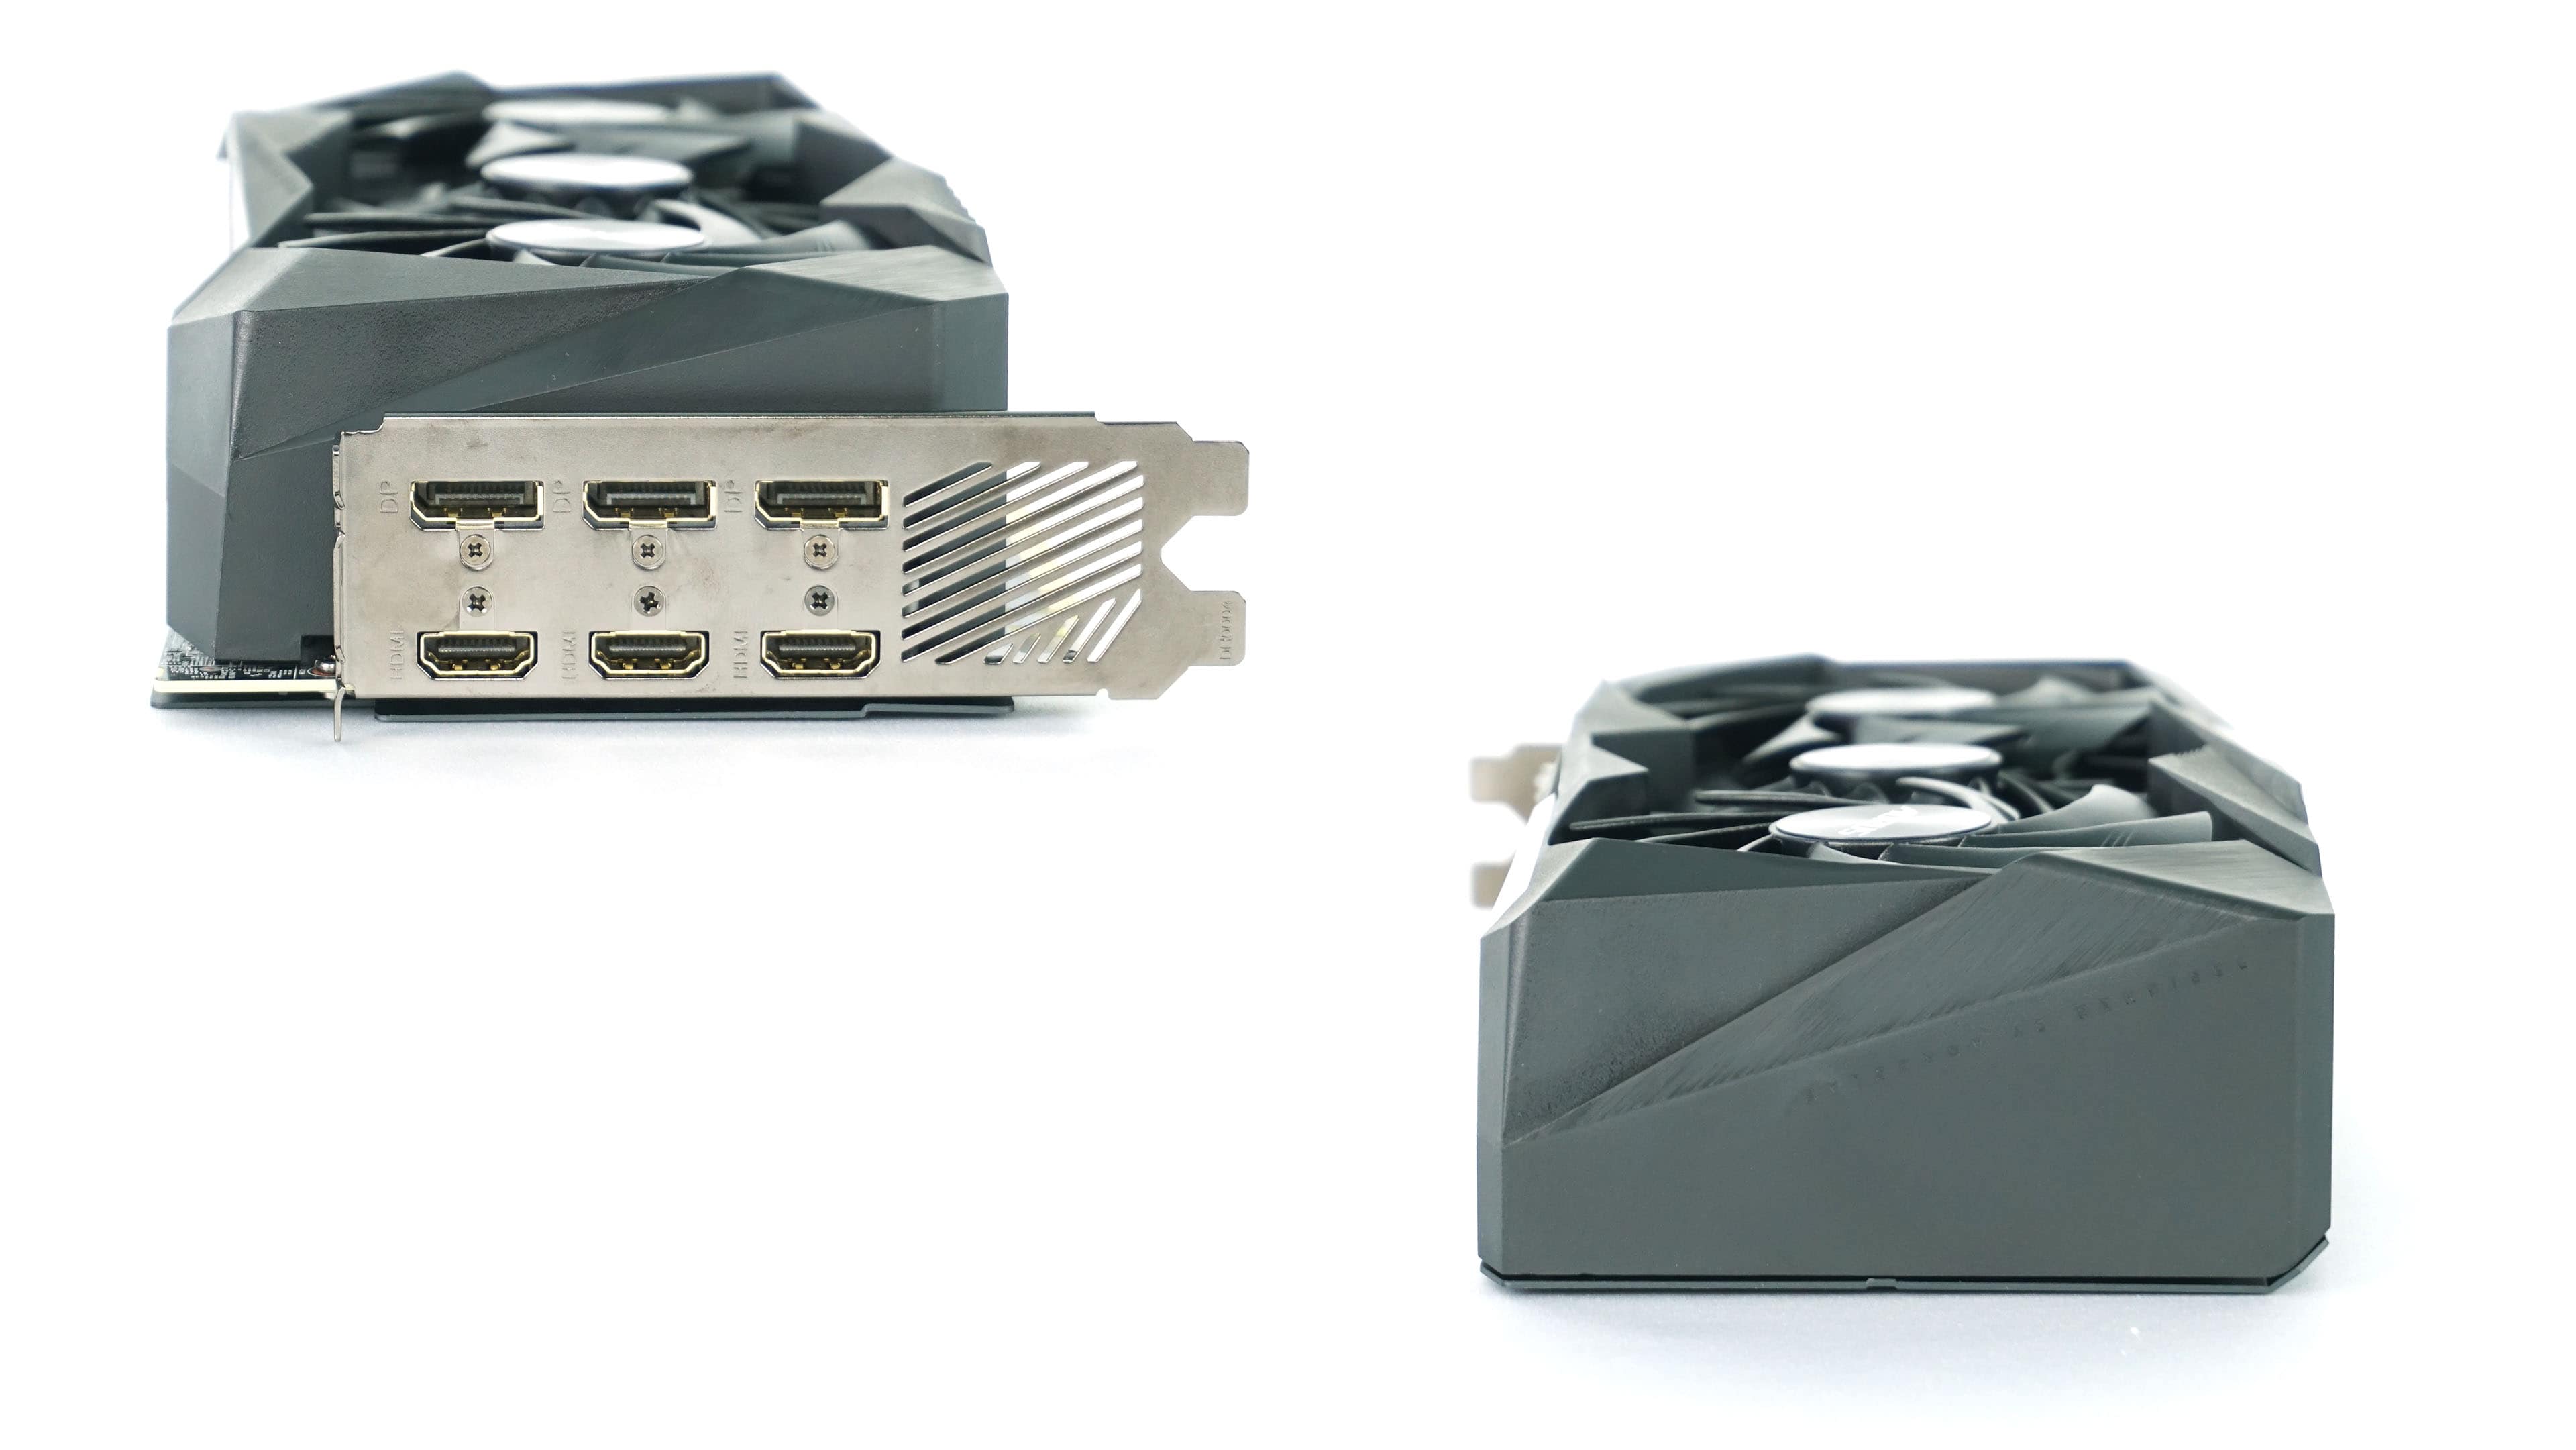
GeForce cards usually have three DisplayPort outputs (useful for gaming on three monitors with G-Sync) and a single HDMI 2.1. Sometimes there are two HDMIs, but then you only have two DisplayPorts. The Aorus Master card from Gigabyte solves this by having both three DisplayPorts to make three-monitor gaming easy, and three HDMI outputs.
Two of these are HDMI 2.1 with high resolution support. HDMI 2.1 even has a higher usable bandwidth compared to DP 1.4, so having more than one of these ports is nice. However, the third port is only HDMI 2.0 with less capabilities in terms of supported resolutions and refresh rates – it’s the middle one, which is easy to remember.

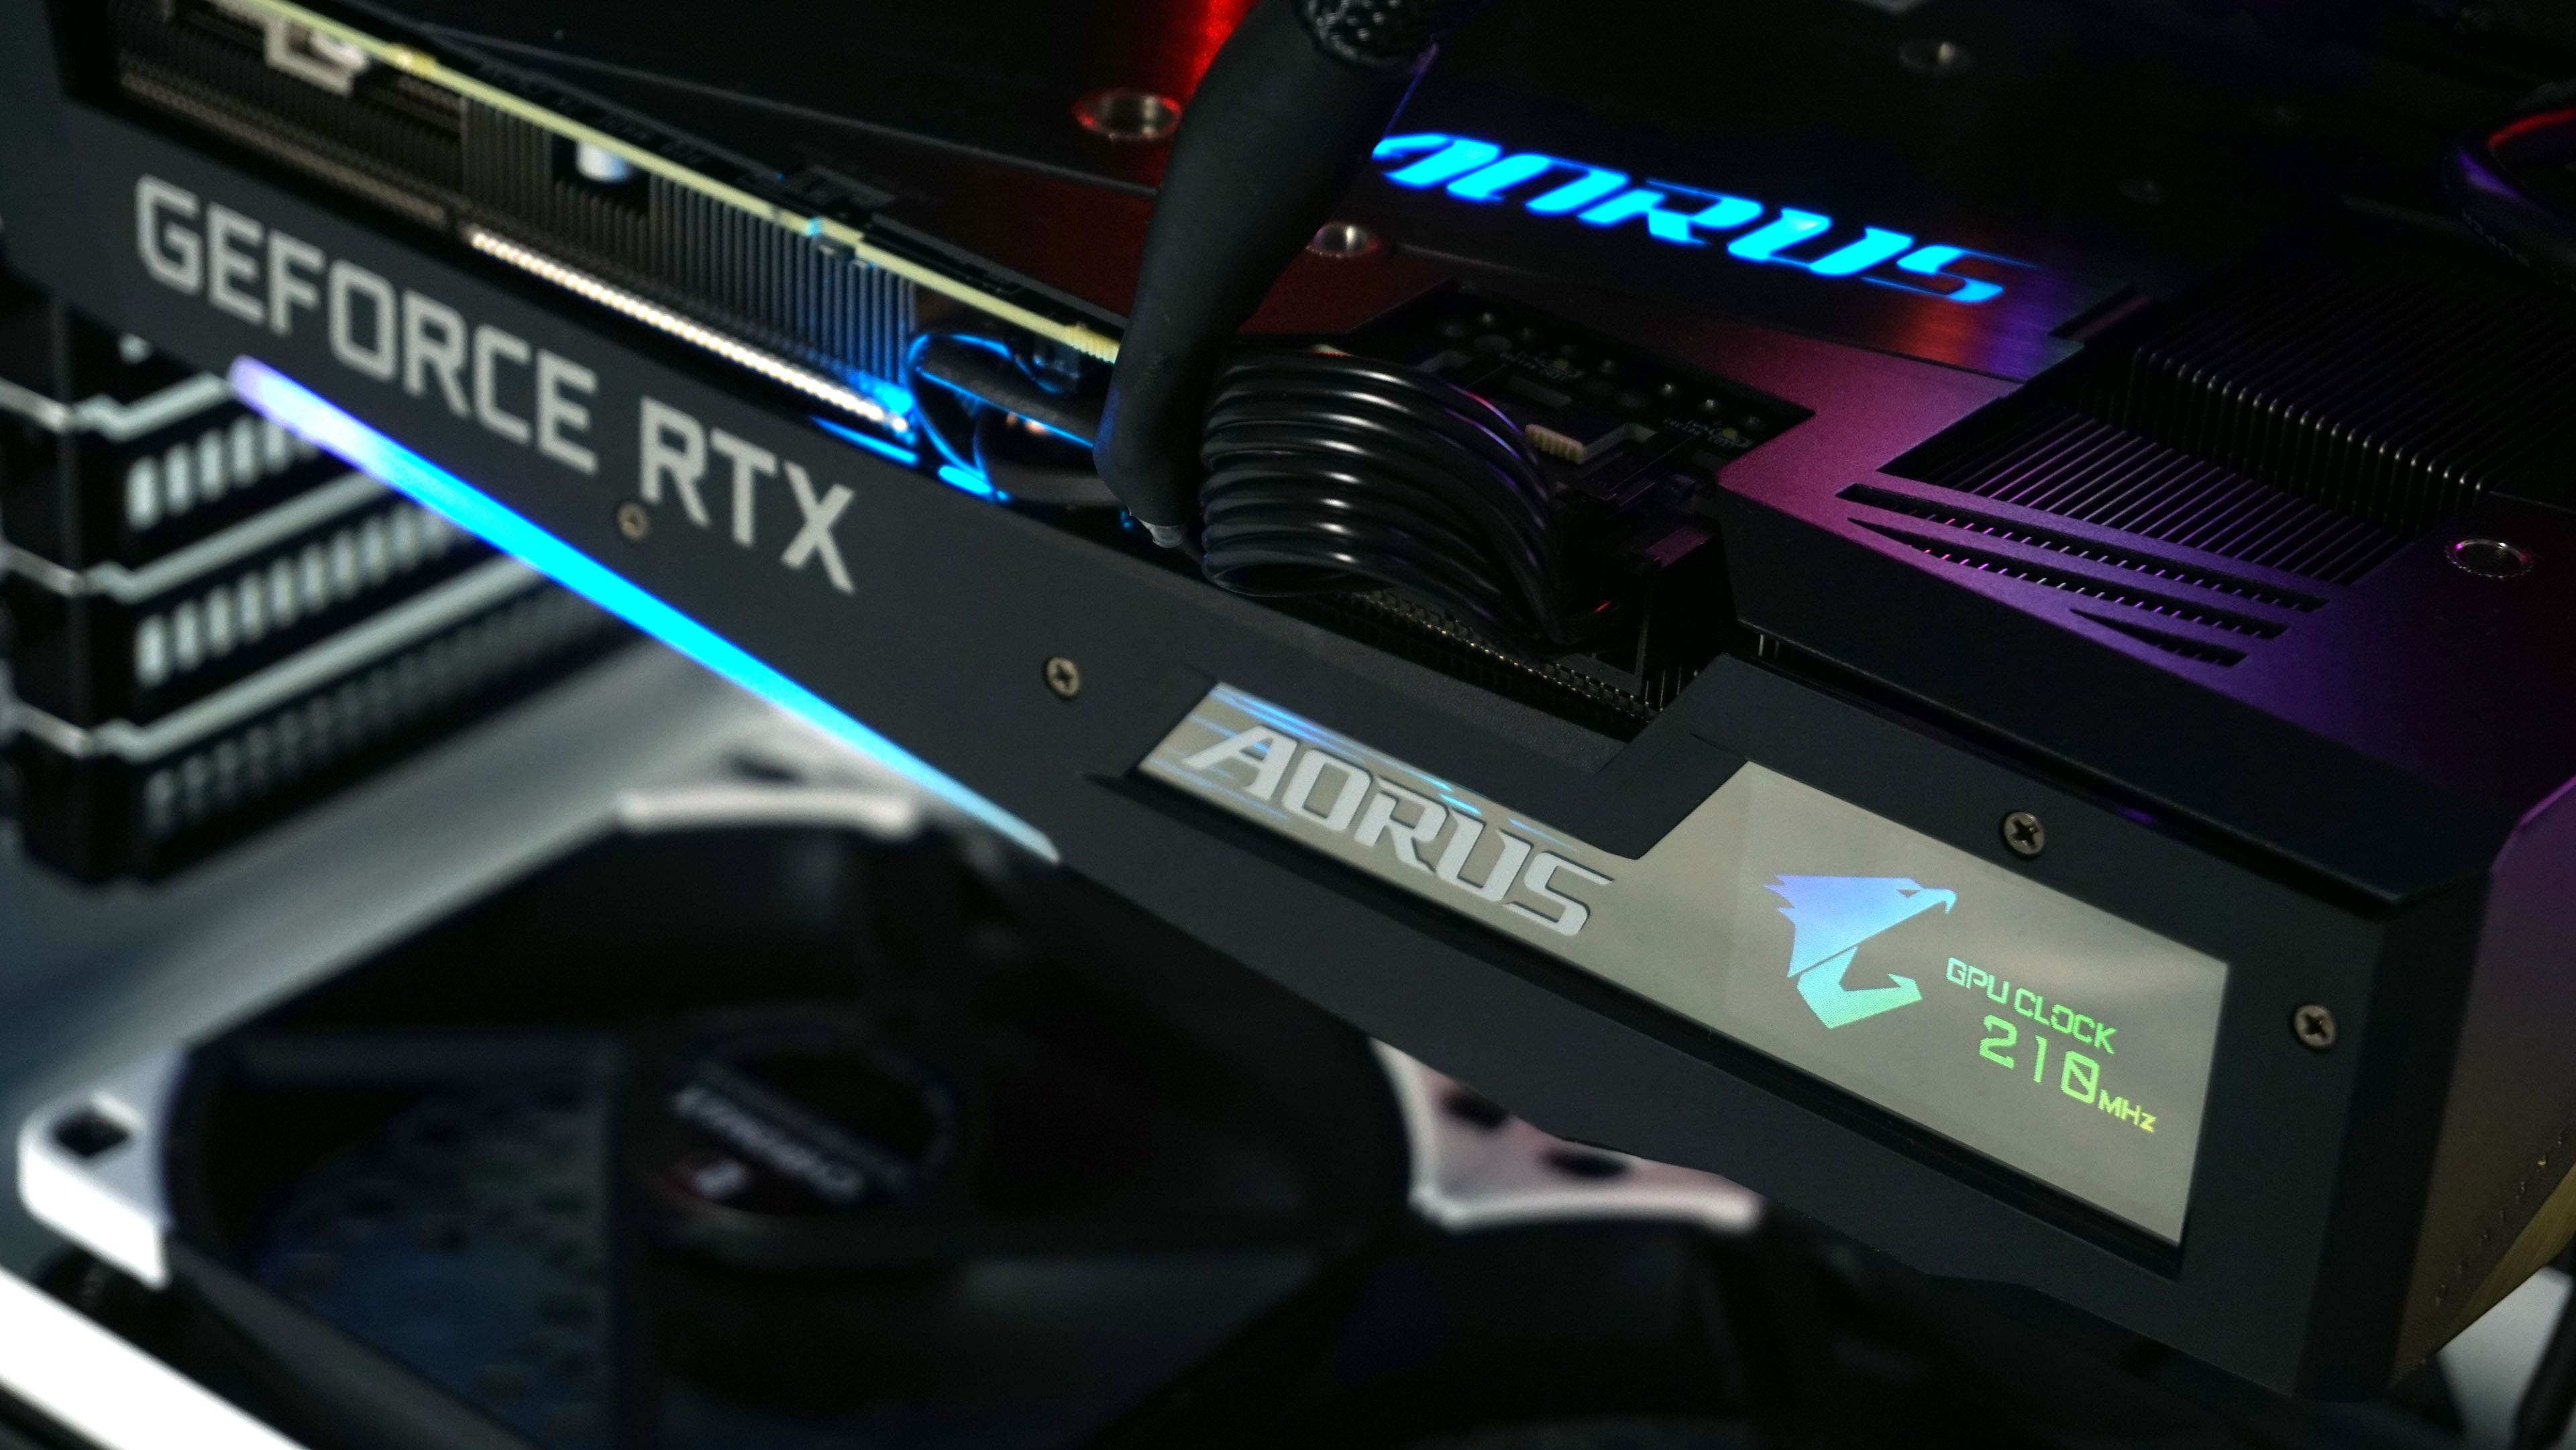
As a specialty, the card has its own color LCD display (called LCD Edge View) on the edge that faces out of the case when the card is mounted the standard way. Reports such as temperature can be shown here, but more importantly, user-selected content is supported too – text, pictures, but also animations.
By the way, the card also has an above-standard – four-year – warranty. You will learn even more in the review.
We are introducing a new testing methodology for graphics cards. One of the reviewed cards will be the GeForce RTX 3070 and we have an interesting one: Aorus GeForce RTX 3070 Master 8G with six video outputs. Before the review comes out, we’ve use it for a visual comparison to see the impact of ray tracing and how the different DLSS settings in the latest Cyberpunk 2077 patch will affect the quality of the game graphics.
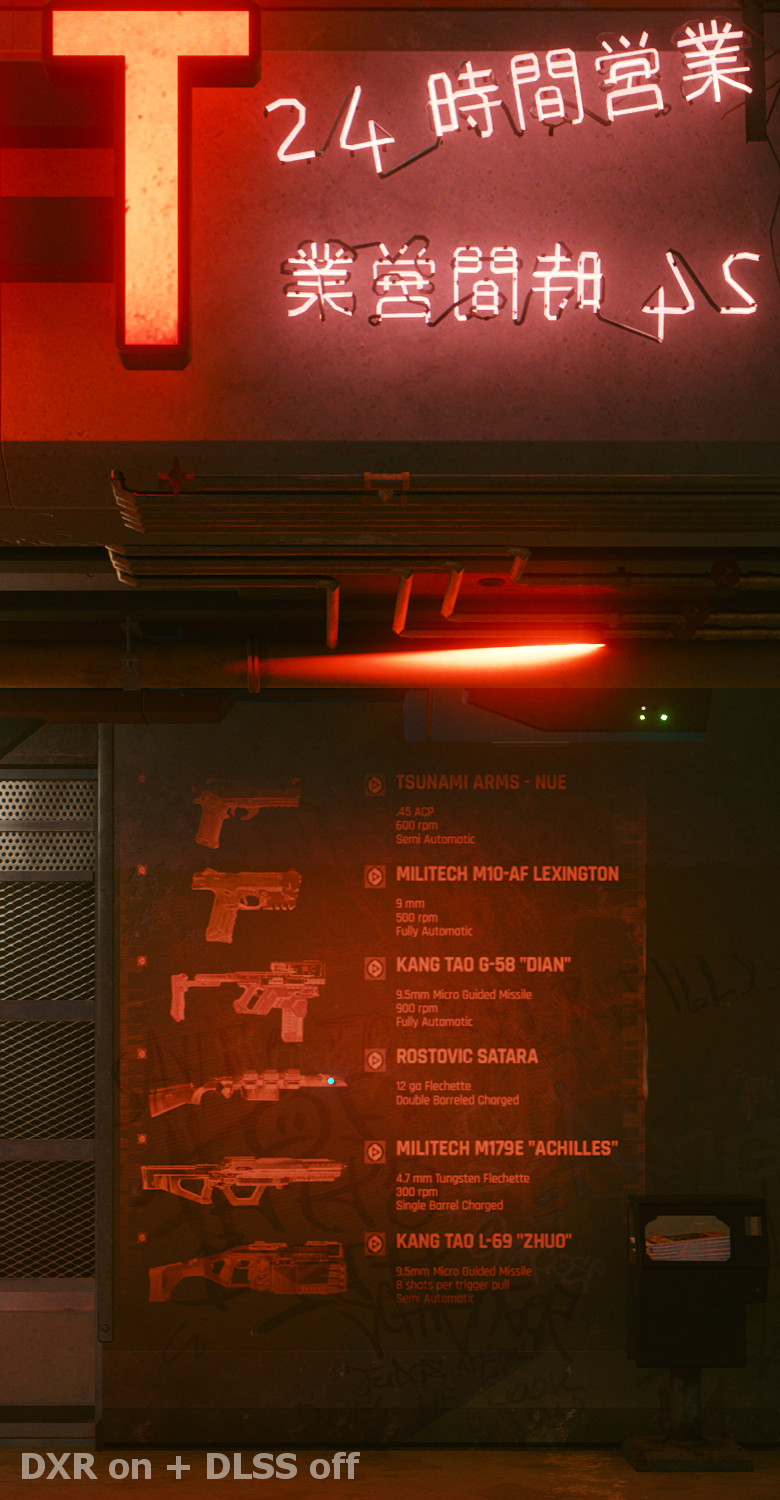
Now let’s move to the promised look at how Cyberpunk 2077 gets rendered with the latest patch 1.1. We were interested in the visual impact of raytracing effects and DLSS. For comparison of reflections without ray tracing and with it, we first have a few images without DLSS. We recommend that you click on the images and switch between them in your browser and. Differences that you would not perceive easily with the two images sitting next to each other on one screen stand out much more when you flip back-forth between two overlayed images.
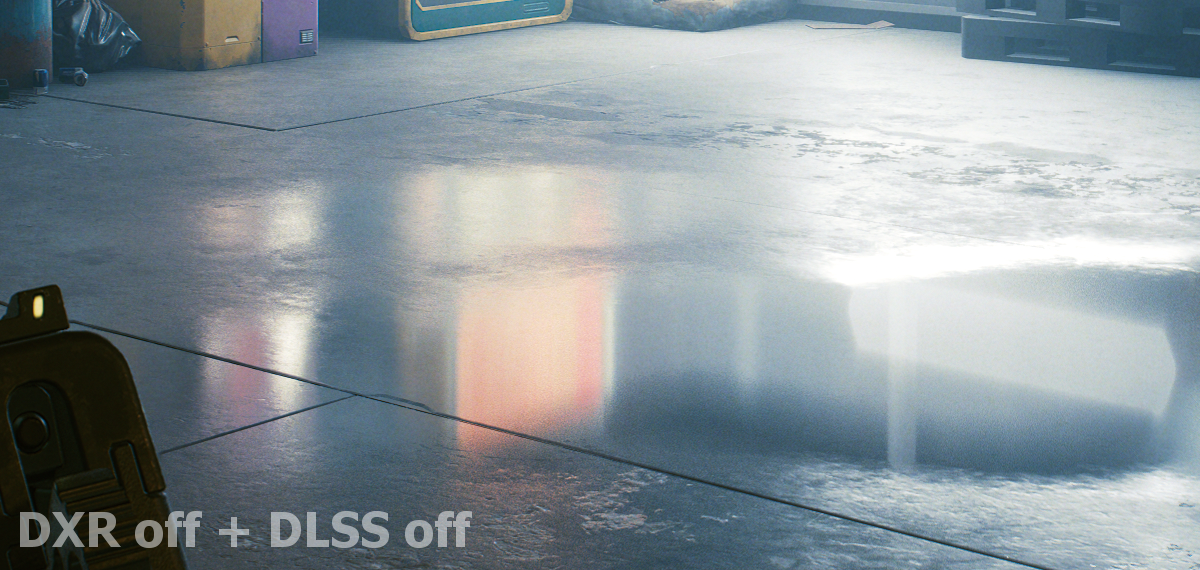
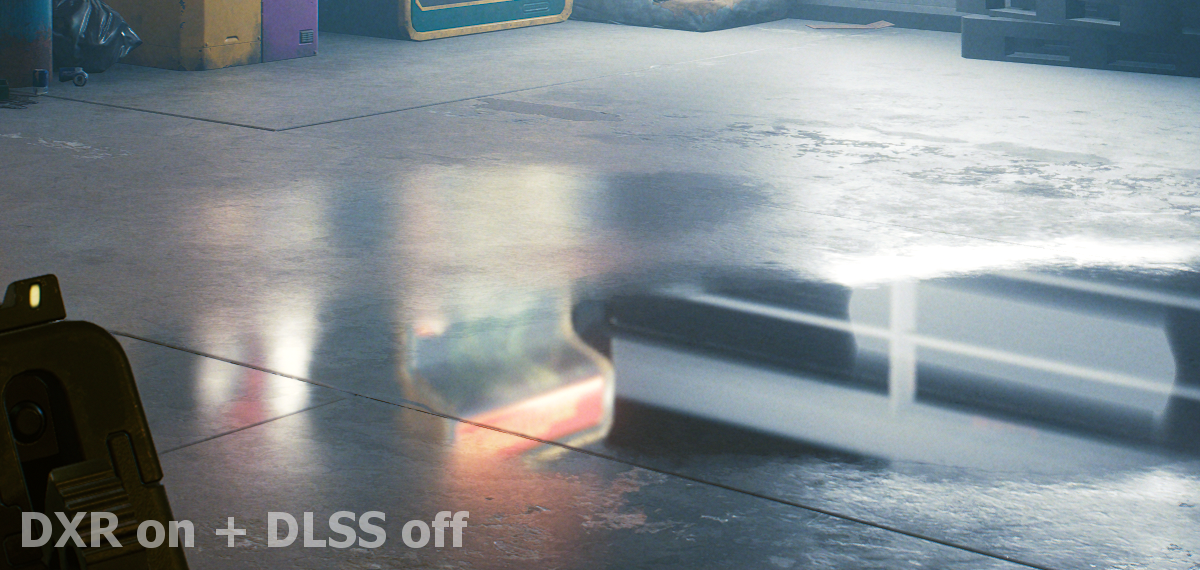
Most of the concrete surface (floor) seem to not look visibly “better” with ray tracing, but that is likely because we as spectators do not know exactly what the creator of the scene intended to show is, exactly. But notice the corner with the paper or cardboard strip lying at the top edge of the cutout. With DXR turned on, there is a noticeable shadow just as could realistically be expected, while without DXR, that shadow is missing.
Furthermore, it can also be seen that without DXR, only a rough simulation of reflection on the water and wet surface is used. The machines appear in the puddle only as a smudge and also the color tint from the rid lighting is applied only in this zone. When reflections are handled by DXR, you can see that the red light affects a much larger part of the scene, including concrete that is less water-covered outside the puddle zone. This should be more in line with how it would look reality. But the biggest difference is clearly what the reflection of the machine looks like: with DXR, its geometry and shape are shown isntead of a rough smudge and we can even see the reflection of the building on the right.
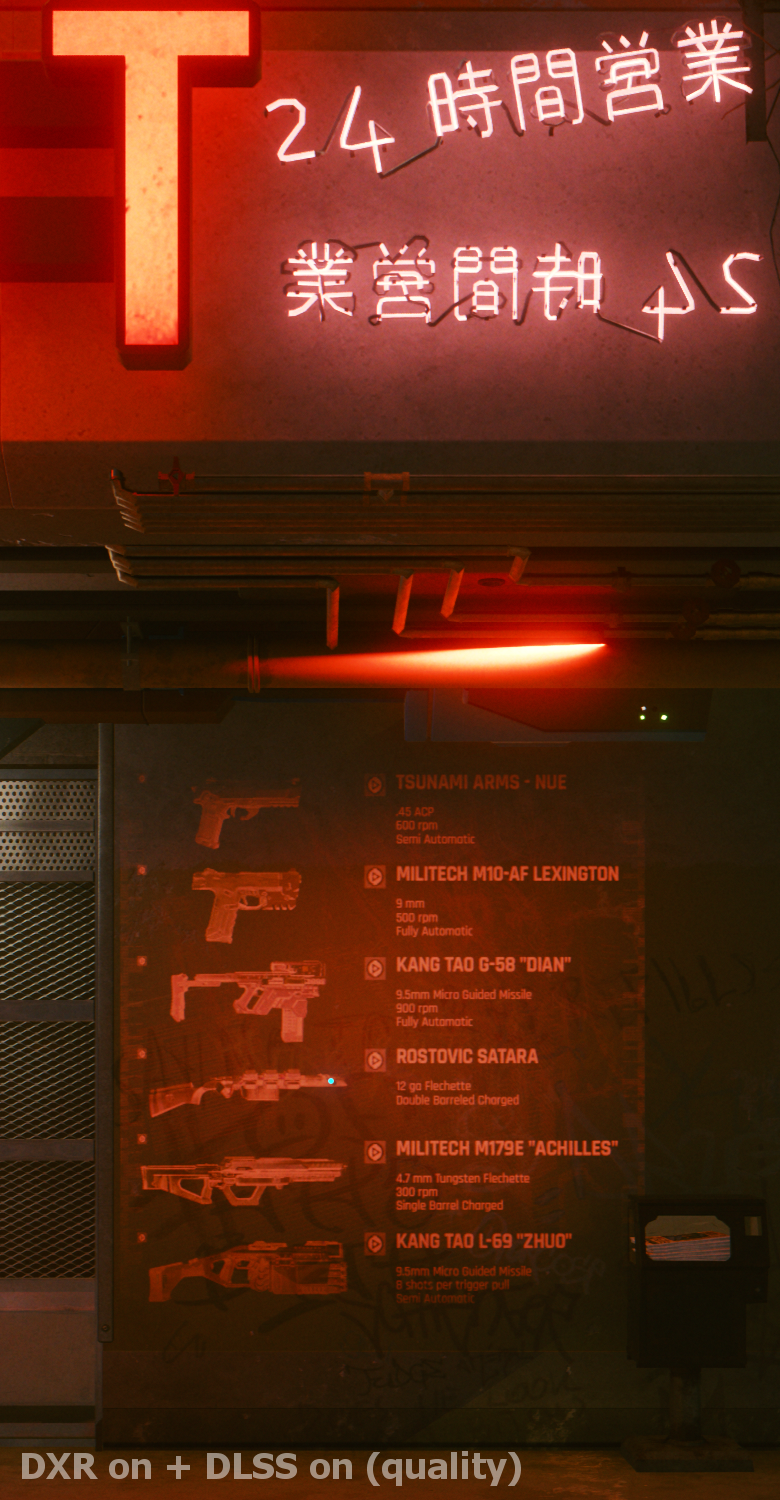
Sharpness of DLSS 2.0
In this puddle scene, DLSS 2.0 seems to be surprisingly good at hiding the amount of upscaling that is taking place – this may be because the scene it’s static, so temporal filtering is better able to “reconstruct” the image from successive frames. If the background and objects were moving, this effect would probably not work as well anymore and the lines and details would turn out to be coarser in faster modes (Performance, Ultra Performance). It would probably be more obvious that they are being upscaled.
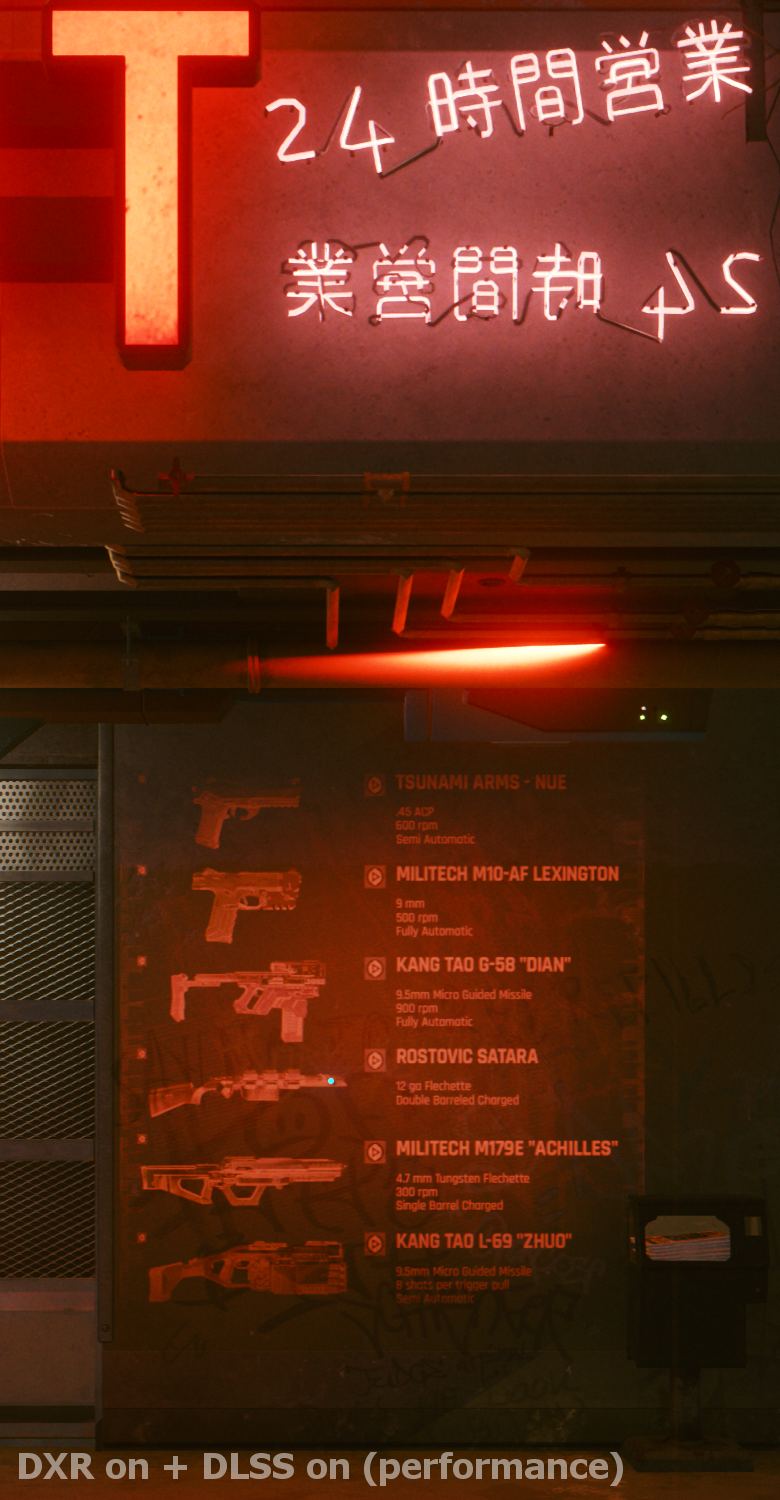
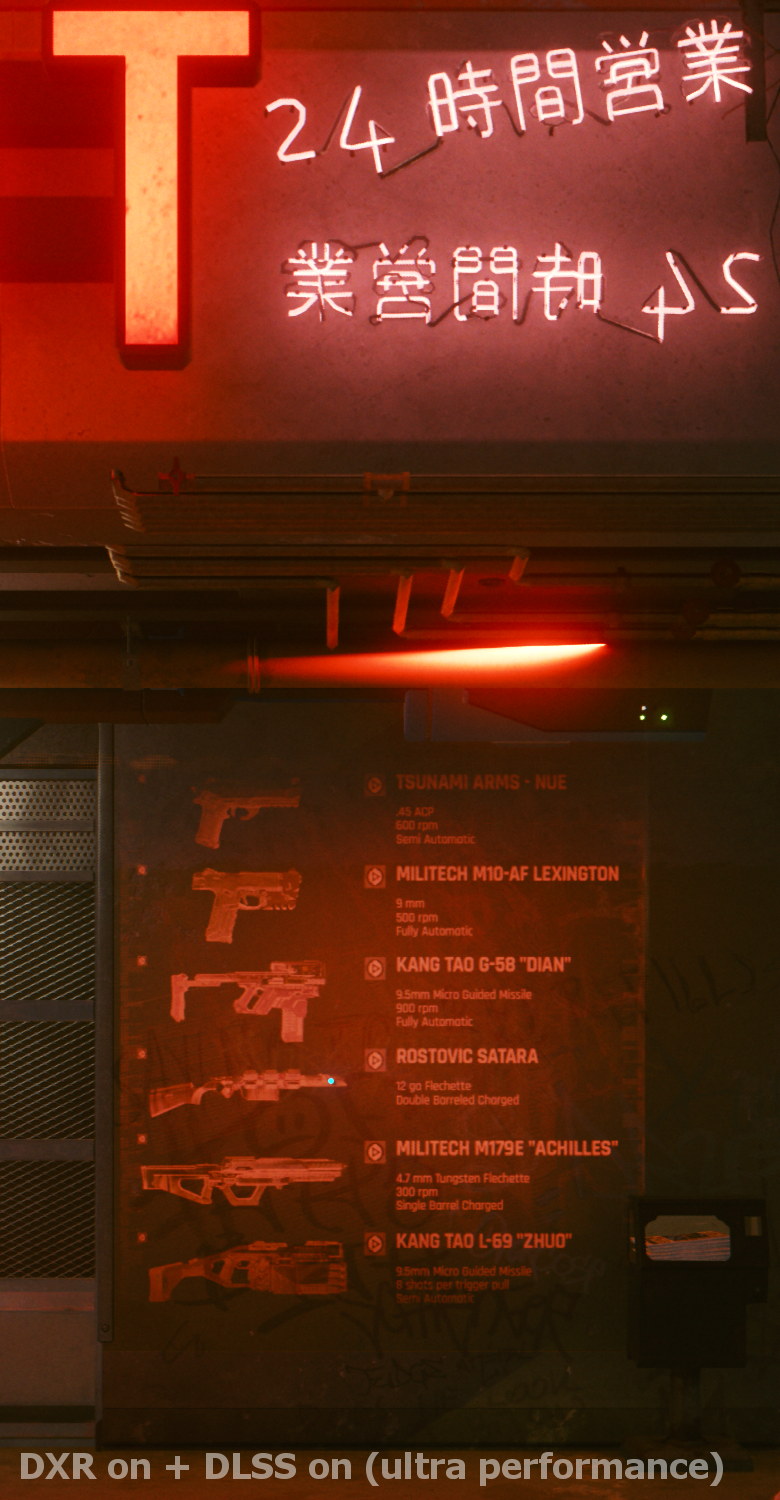
DLSS in Quality mode should upscale the image from two-thirds resolution (66%), but note that this means 66% in one axis, not 66% of pixel count. Instead of 3840 × 2160 pixels, the image is rendered at 2560 × 1440. The balanced mode reduces the factor to 56% in both axes. The Performance mode then has a factor of 50%, so it performs exactly 2× scaling in both axes, so the number of source pixels is only a quarter (for 4K output, only 1920 × 1080 is rendered). DLSS in Ultra Performance mode is even more extreme, with a factor of 33%. This means that 3840 × 2160 is obtained by 3x magnification in both axes, so the actual rendering resolution is only 1280 × 720 pixels (one-ninth of total pixels…). This mode is intended mainly for 8K output – in that case, the real rendering resolution is 2560 × 1440.


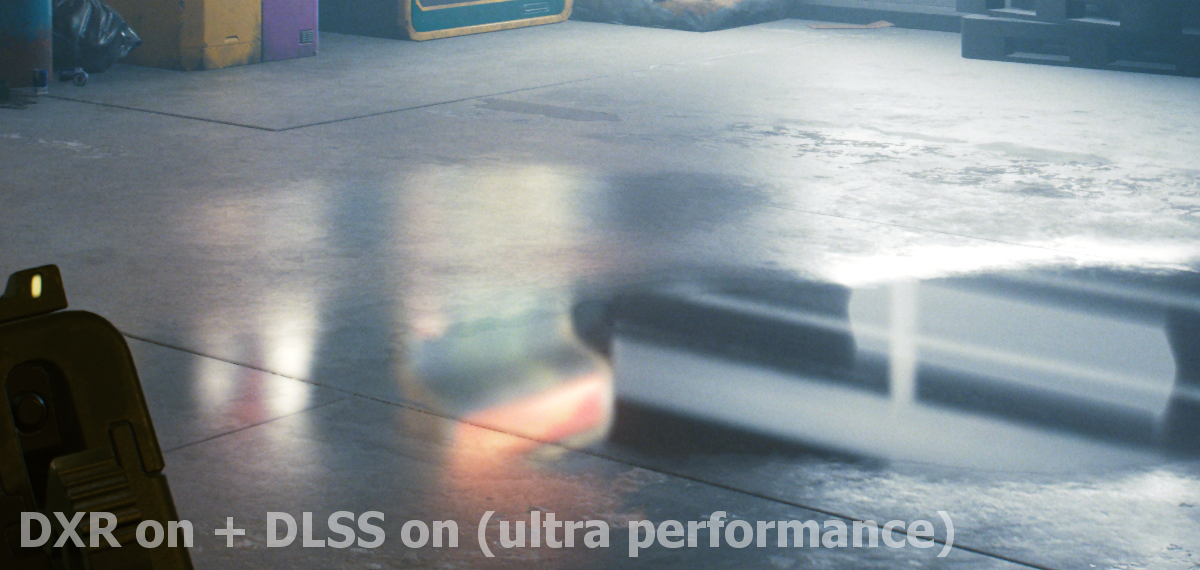
You can spot differences between Quality and Ultra Performance. For example, upscaling and temporal filtering to a higher resolution caused a loss of transition between the two pallets placed on each other in the upper right corner, which low-contrast, but perceptible by human observer. Such low-contrast edges/lines are more difficult to recognize for artificial intelligence/automatic algorithms. Perhaps the biggest difference is shown in the rendering of the machine reflected in the puddle: its detail gradually deteriorates when going down from Quality through Balanced, Performance to Ultra Performance mode.
In general, however, the image still retains about equal sharpness. This is a good result. Rendering is less accurate and it is being “manufactured” by artificial computation using a neural network and temporal averaging, but the similar degree of sharpness, equally thin lines successfully disguise that. What probably also helps to mask it is the generous amount of added noise, which I guess might be inserted only after the application of DLSS 2.0 (not sure about that).
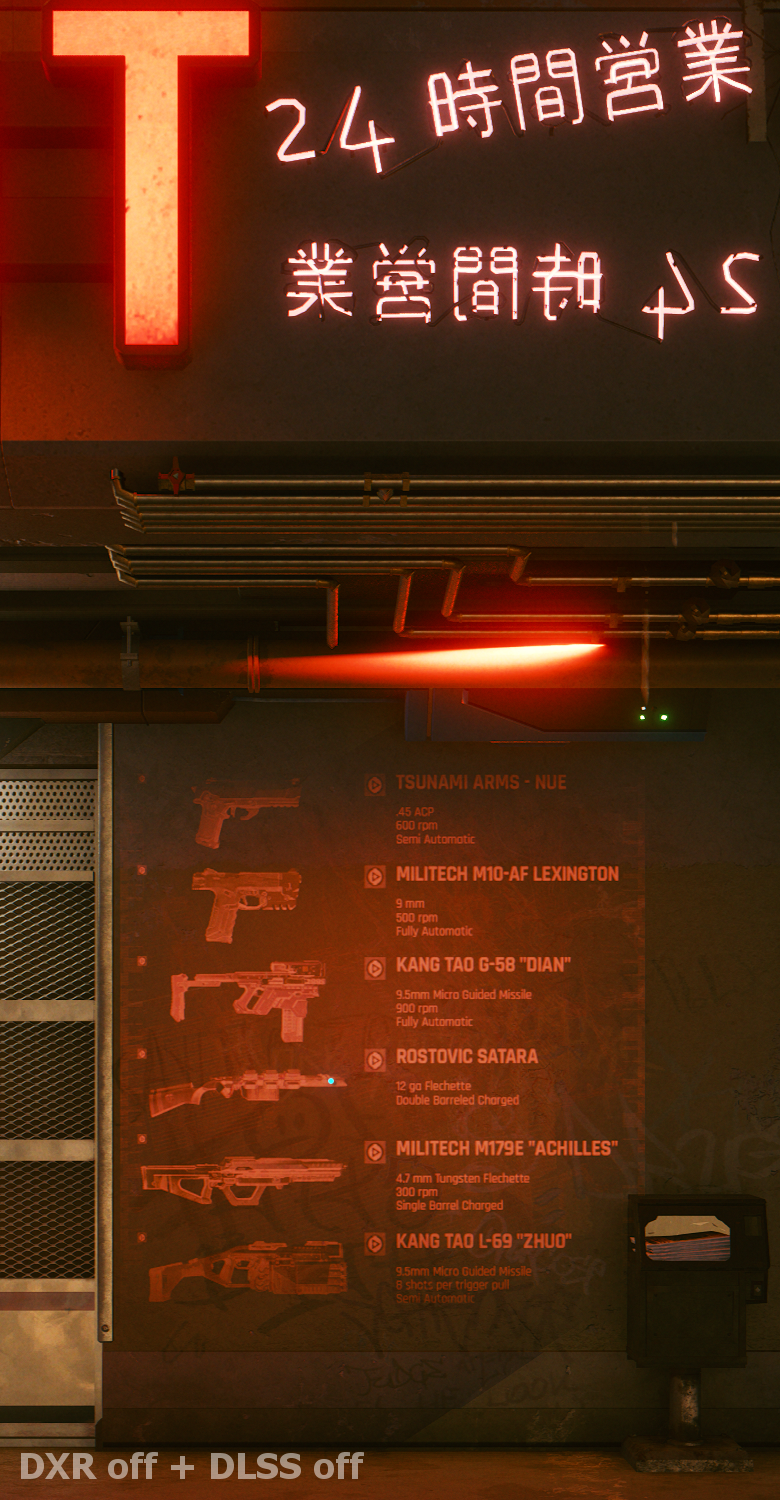
Scene 2
In the second scene, the difference between DXR disabled and DXR enabled is shown first (first two screenshots). Notice how the grids/mesh and perforated metal sheet on the wall to the left look quite artificial without DXR. The second image gives them a significantly different look, the metalic and shiny character of the surface look more realistic. Without DXR, this part was unnaturally light (which is probably an attempt to simulate metal surface), but this disappears when DXR is turned on. With ray tracing the shadow under the box at the bottom right looks more realistic too, as expected. However, even the overall contrast of the bright area under the lamp and the darkened parts away from it looks better.

But this scene is also more interesting to us in that you can actually find larger differences between the individual speed settings of DLSS in it. This proves the (arguably intuitive) assumption thatthe higher FPS can’t be a free lunch and the quality decrease caused by lower native rendering resolution has to show up somewhere.
It can be noticed that when you gradually switch from Quality to Balanced, then Performance and finally Ultra Performance, the sharpness of the text deteriorates somewhat (especially the label for the last weapon at the bottom). Interesting thing to look at is the grid on the left, the three lower panels with the diagonal wire grid – with higher performance (lower quality) DLSS modes, this area suffers exhibts peculiar artifacting: the image of wires going in one of the directions is disappearing and only the the other direction remains, which makes the grid looks like a one-direction stripe pattern. At Ultra Performance, the less illuminated lower fields of this grid are already generally degraded by artifacts. The lines are still being preserved in at least one direction, but they now look somewhat “hairy”. The AI upscaling and temporal filtering is fighting valiantly here, while there is damage, the texture has not blurred/disintegrated completely. But it clearly shows that the visual gradually loses more detail and sustains some damage as you choose these faster DLSS modes. Basically these are the actual costs of that proverbial free FPS lunch.
The detail and rendering fidelity also deteriorates quite a bit on the ceiling between the pipes located there. And what is especially interesting: in this area you can actually see the difference between the best mode DLSS (Quality) and completely native resolution (DLSS Off). You can see the boundaries between the individual narrow pipes partially disappear (which then worsens in faster DLSS modes). There is also quite significant difference in the detail/sharpness of the texture underneath the text, and information shown about the weapon. Even the best DLSS Quality will already make these parts of image visibly less sharp. The difference in rendering quality is quite large here, almost reminiscent of texture blur you can see in video compression. As already mentioned, the higher FPS can not be had for free.
We are introducing a new testing methodology for graphics cards. One of the reviewed cards will be the GeForce RTX 3070 and we have an interesting one: Aorus GeForce RTX 3070 Master 8G with six video outputs. Before the review comes out, we’ve use it for a visual comparison to see the impact of ray tracing and how the different DLSS settings in the latest Cyberpunk 2077 patch will affect the quality of the game graphics.
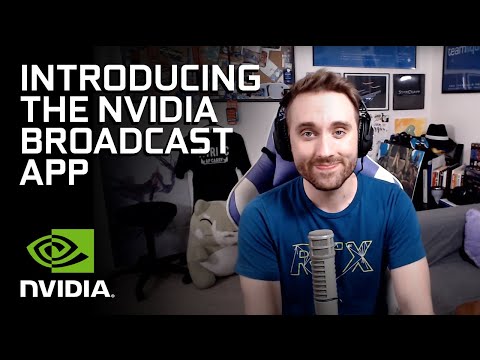
Tensor cores present in Nvidia GPUs to accelerate AI computations, are most importantly employed in DLSS (including DLSS 2.x), where they provide performance for the neural network-based interpolation algorithm and most likely contributing the lion’s share to the result that DLSS is capable of achieving. But one more use of tensor cores has come with GeForce RTX 3000 graphics: Nvidia uses them in the Broadcast App application, which is designed to improve the video quality when you stream your game, or even for use in video production, but also in ordinary video chatting.
Our plan to test this technology was foiled by a missing webcam. But since we didn’t previously cover the Broadcast application (as it is still more of a software feature, albeit hardware-accelerated, we ended up not including a writeup on it in our Ampere architecture analysis), it doesn’t hurt to take a look at what Broadcast does and why it may be good for you, now.
Nvidia Broadcast App features
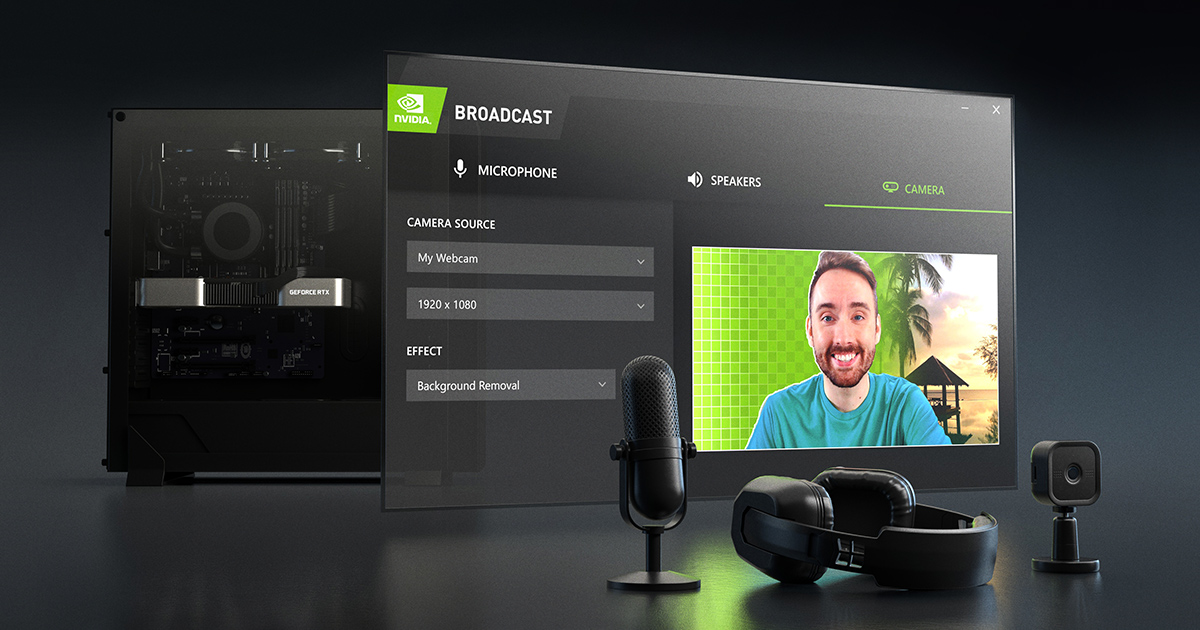
Nvidia Broadcast is likely to be developed further in the future, but currently it offers several enhancements that you can use with your video. The first functionality, called Virtual Background, automatically removes distracting backgrounds behind you. This can be used to insert an overlay of your own face or figure from a webcam into your game stream, with the video from the game put behind you/around you. Or you can hide the environment in which you are shooting and replace it with a photo or some virtual scene, like in a TV studio. You normally need a “green screen” for this, but thanks to the artificial intelligence algortim, the Broadcast App can erase any background even without such special equpiment. So with this, you should be able to broadcast with such green-screen stlye virtual background from just about anywhere (don’t do it from bathroom, please). And a bonus for less orderly people: they don’t have to clean their room, with this. There is also a simple option to just blur the background while still keeping the person in the foreground fully sharp and defined.
Broadcast App also seems to build on the previously announced RTX Audio technology and offers similar sound “cleaning” functionality as well – but this time it is about suppressing ambient noise in a audio track/input. The Noise Removal filter uses a trained neural network that removes unwanted sounds and noise, so it again allows you to broadcast (or communicate) well, even from an environment where there would otherwise be too much interference. Or other sounds that the other party should ideally not hear.
Another intelligent feature is Auto Frame. This, in turn, solves the problem that your webcam is not a living cameraman and does not capture you perfectly, especially when you move in front of it. Auto Frame solves this – it automatically detects the person in the shot and tries to zoom in and out on them and move the cropped area of the picture such that the focus on the person stays correct and good looking even as they move. In particular, Auto Frame can dynamically adjust the relevant cut-out from the camera’s unprocessed footage when you move, tilt, and so on. By adjusting crop and zoom, you will always stay in the shot, as if the camera was moving and zooming to automatically capture your position. You can see it demonstrated here on video (not ours) from the official presentation of the application:
Nvidia Broadcast can be used from a variety of existing applications, so you can already use it from your favorite apps. Broadcast App works as an intermediate layer between the input from your real camera (and microphone), which it processes. The application adds a Nvidia Broadcast virtual device to the system that acts as a camera and microphone: you can then set it as input in a communication program, streaming application or anywhere, and just like that, the application now uses input modified by Nvidia Broadcast App filters – without the need for adding any explicit support or needing updates.
Broadcast App is already available for download. It may be worth noting that it is not directly bound to GeForce RTX 3000 cards. It only requires the presence of tensor cores, so it also works on GeForce RTX 2000 graphics (from RTX 2060 and higher).
Translated, original text by: