


Finally, a 140mm fan that doesn’t wade between the 120mm ones, but has a clear edge over them – even the “best” ones. And it’s a completely different story than its smaller brother, whose biggest negatives are avoided by the 140mm model. But there is one new, rather unnecessary flaw. However, it can be eliminated, with a trade-off. But you might not even notice it, and then you can consider this fan an excellent choice.
We’ve already had one Silent Wings Pro 4 fan here, but this one—the second, larger one—doesn’t look much like it. Visually, though, it doesn’t deny its affiliation with BeQuiet! (and not even to the SWP4 series), but as far as the design is concerned, it’s as if a completely different team of designers worked on it, who didn’t communicate with those from the 120 mm model team at all. And we don’t mean that in a bad way at all.

The blade surface is grooved, which is a must for BeQuiet! and this modification is especially useful on the intake side, where it somewhat reduces unwanted streamline slipping along the blades by higher friction due to centrifugal force and also suppresses microturbulence. As a result of those things a slightly higher airflow can be achieved at a lower noise level. The less turbulent the intake flow is, the quieter the operation.
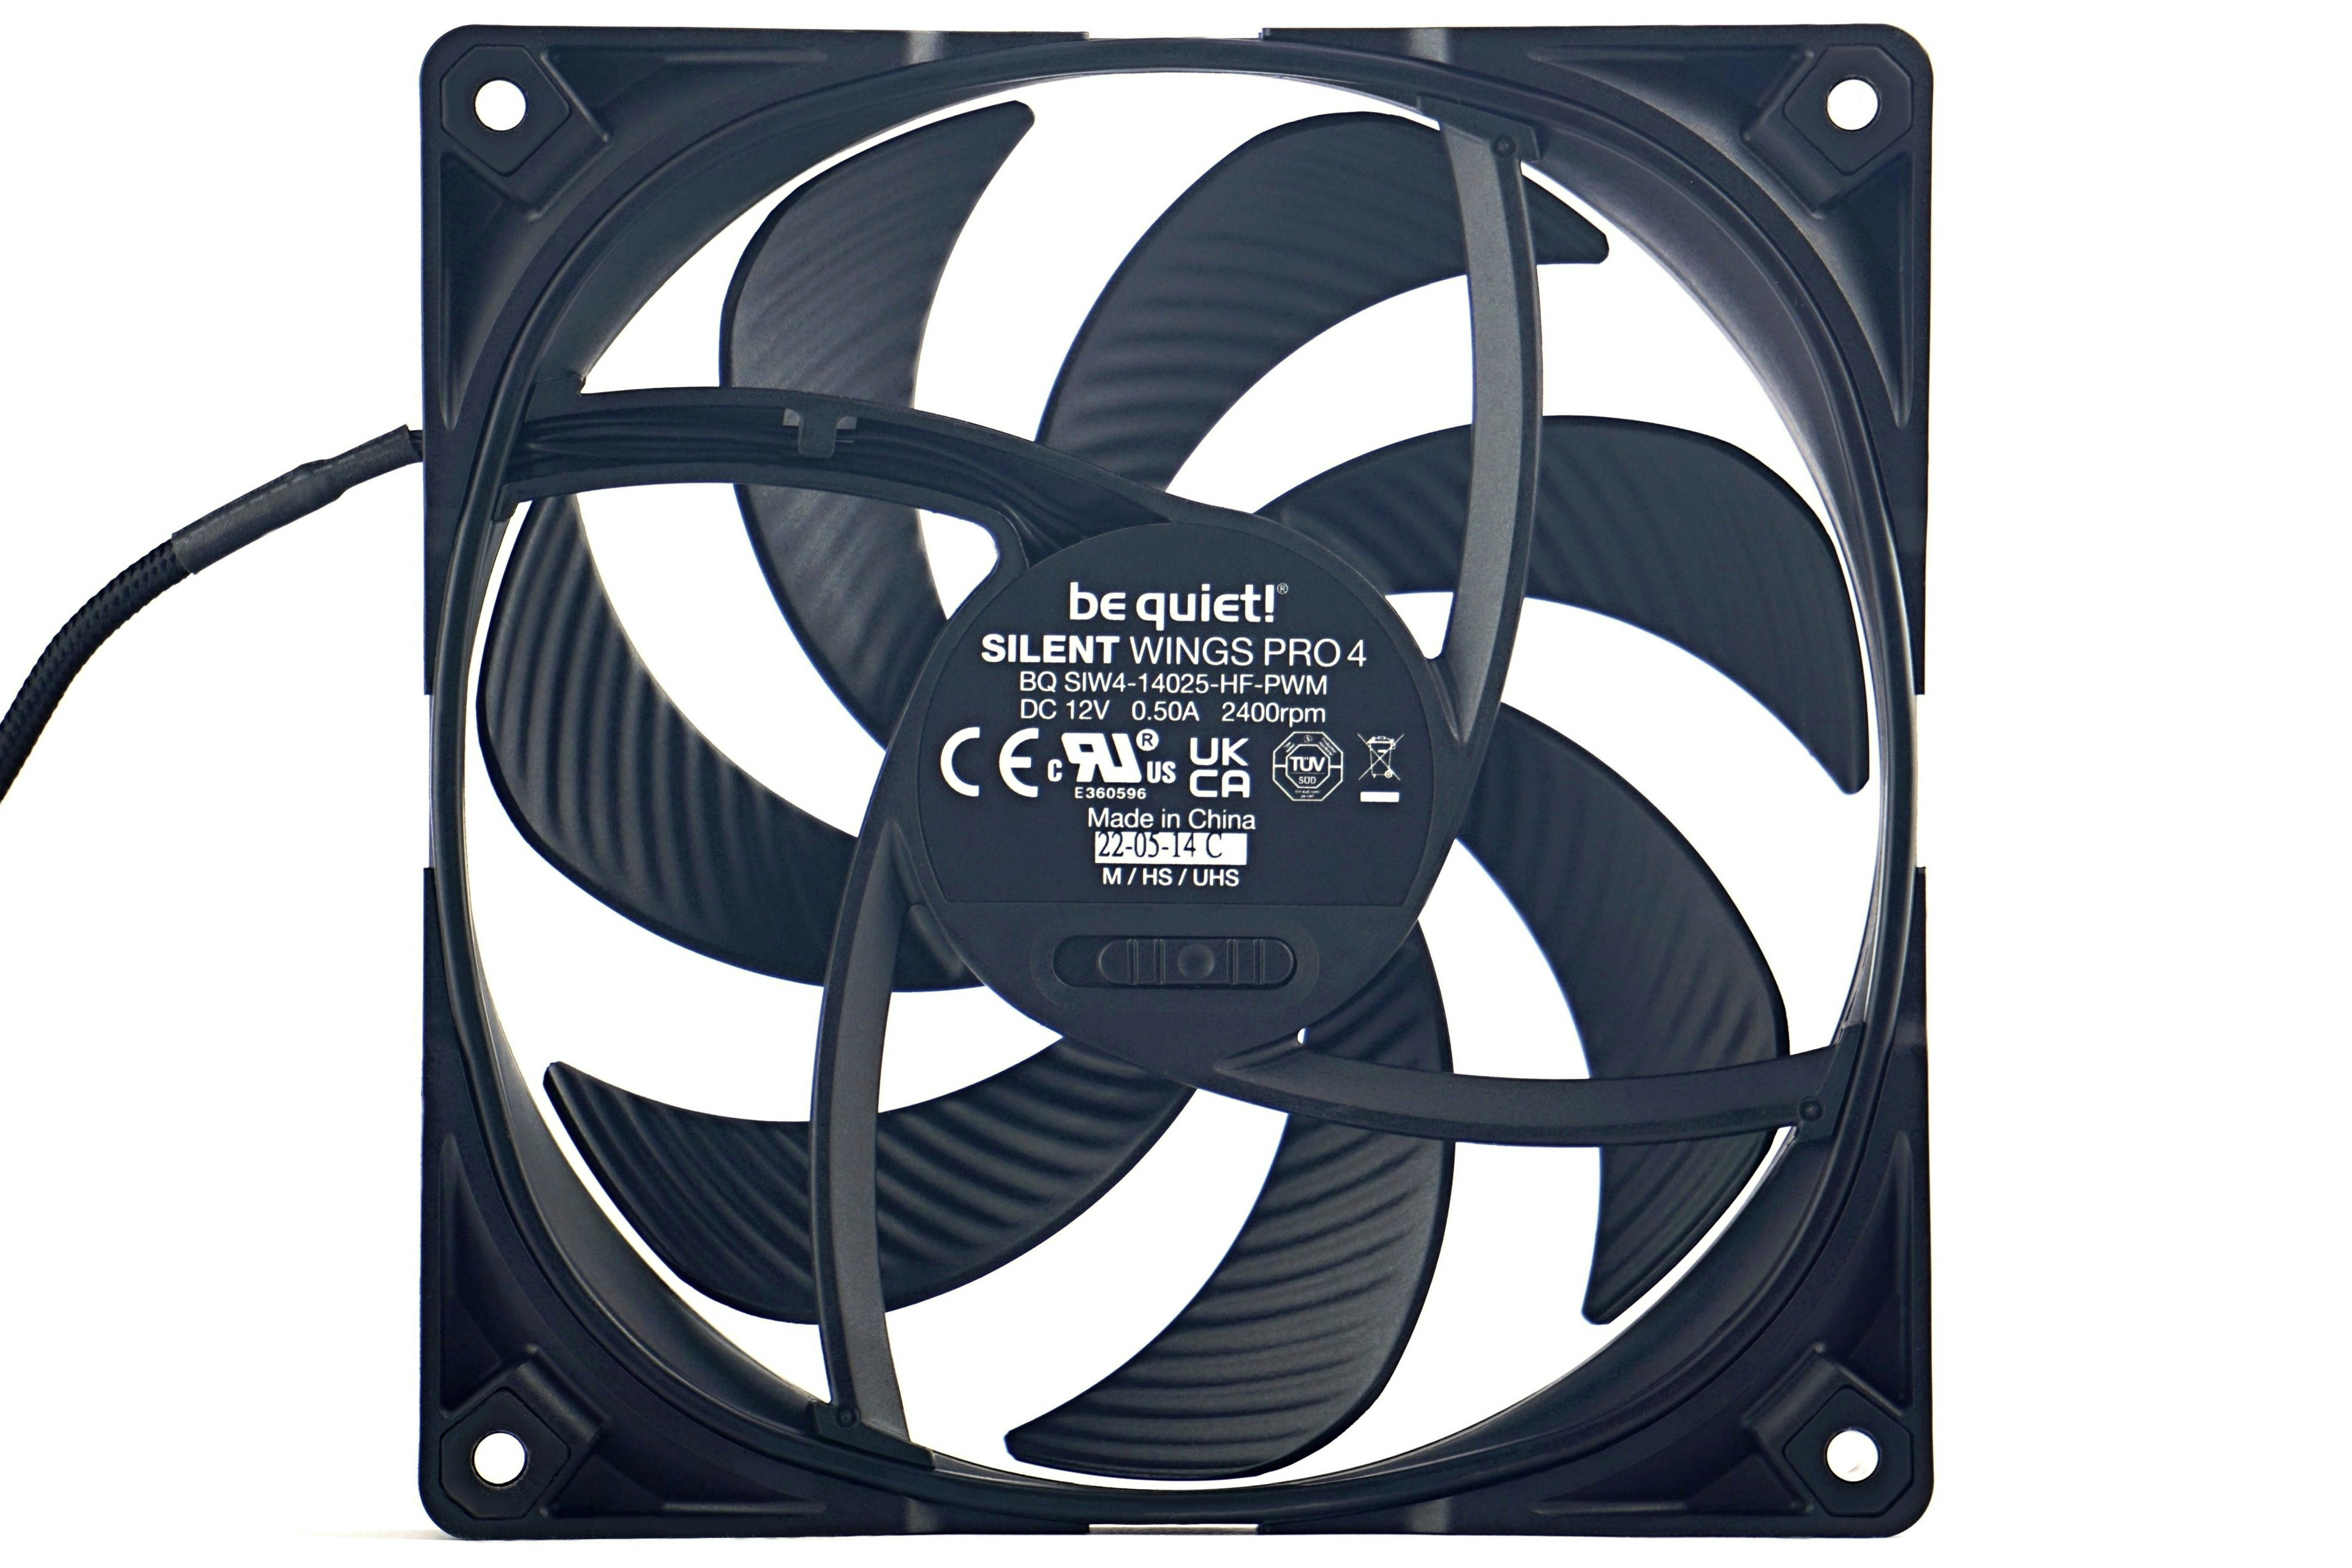
Common to the 120 and 140mm Silent Wings 4 Pro fans then are the fluid bearings and the mean time between failure is claimed to be an exceptionally high 300,000 hours and the mounting corners kit is the same as with the 120mm models, we’ll come back to these at the end of the chapter. For the moment, the rotor analysis is more relevant. At first glance, it differs significantly from the smaller fans in this series (SWP4) and it is definitely not just a matter of proportionally enlarging it, as some other manufacturers do.
While the 120mm Silent Wings Pro 4 has nine blades, the 140mm variant has only seven. In addition, the geometry of the blades is also different. These are 25% longer on the larger SWP4 at 50mm, but at the same time slightly narrower (but again, thicker), especially at the base of the hub. The latter itself is otherwise unchanged and makes up approximately 2100 mm2 of the total cross-section.
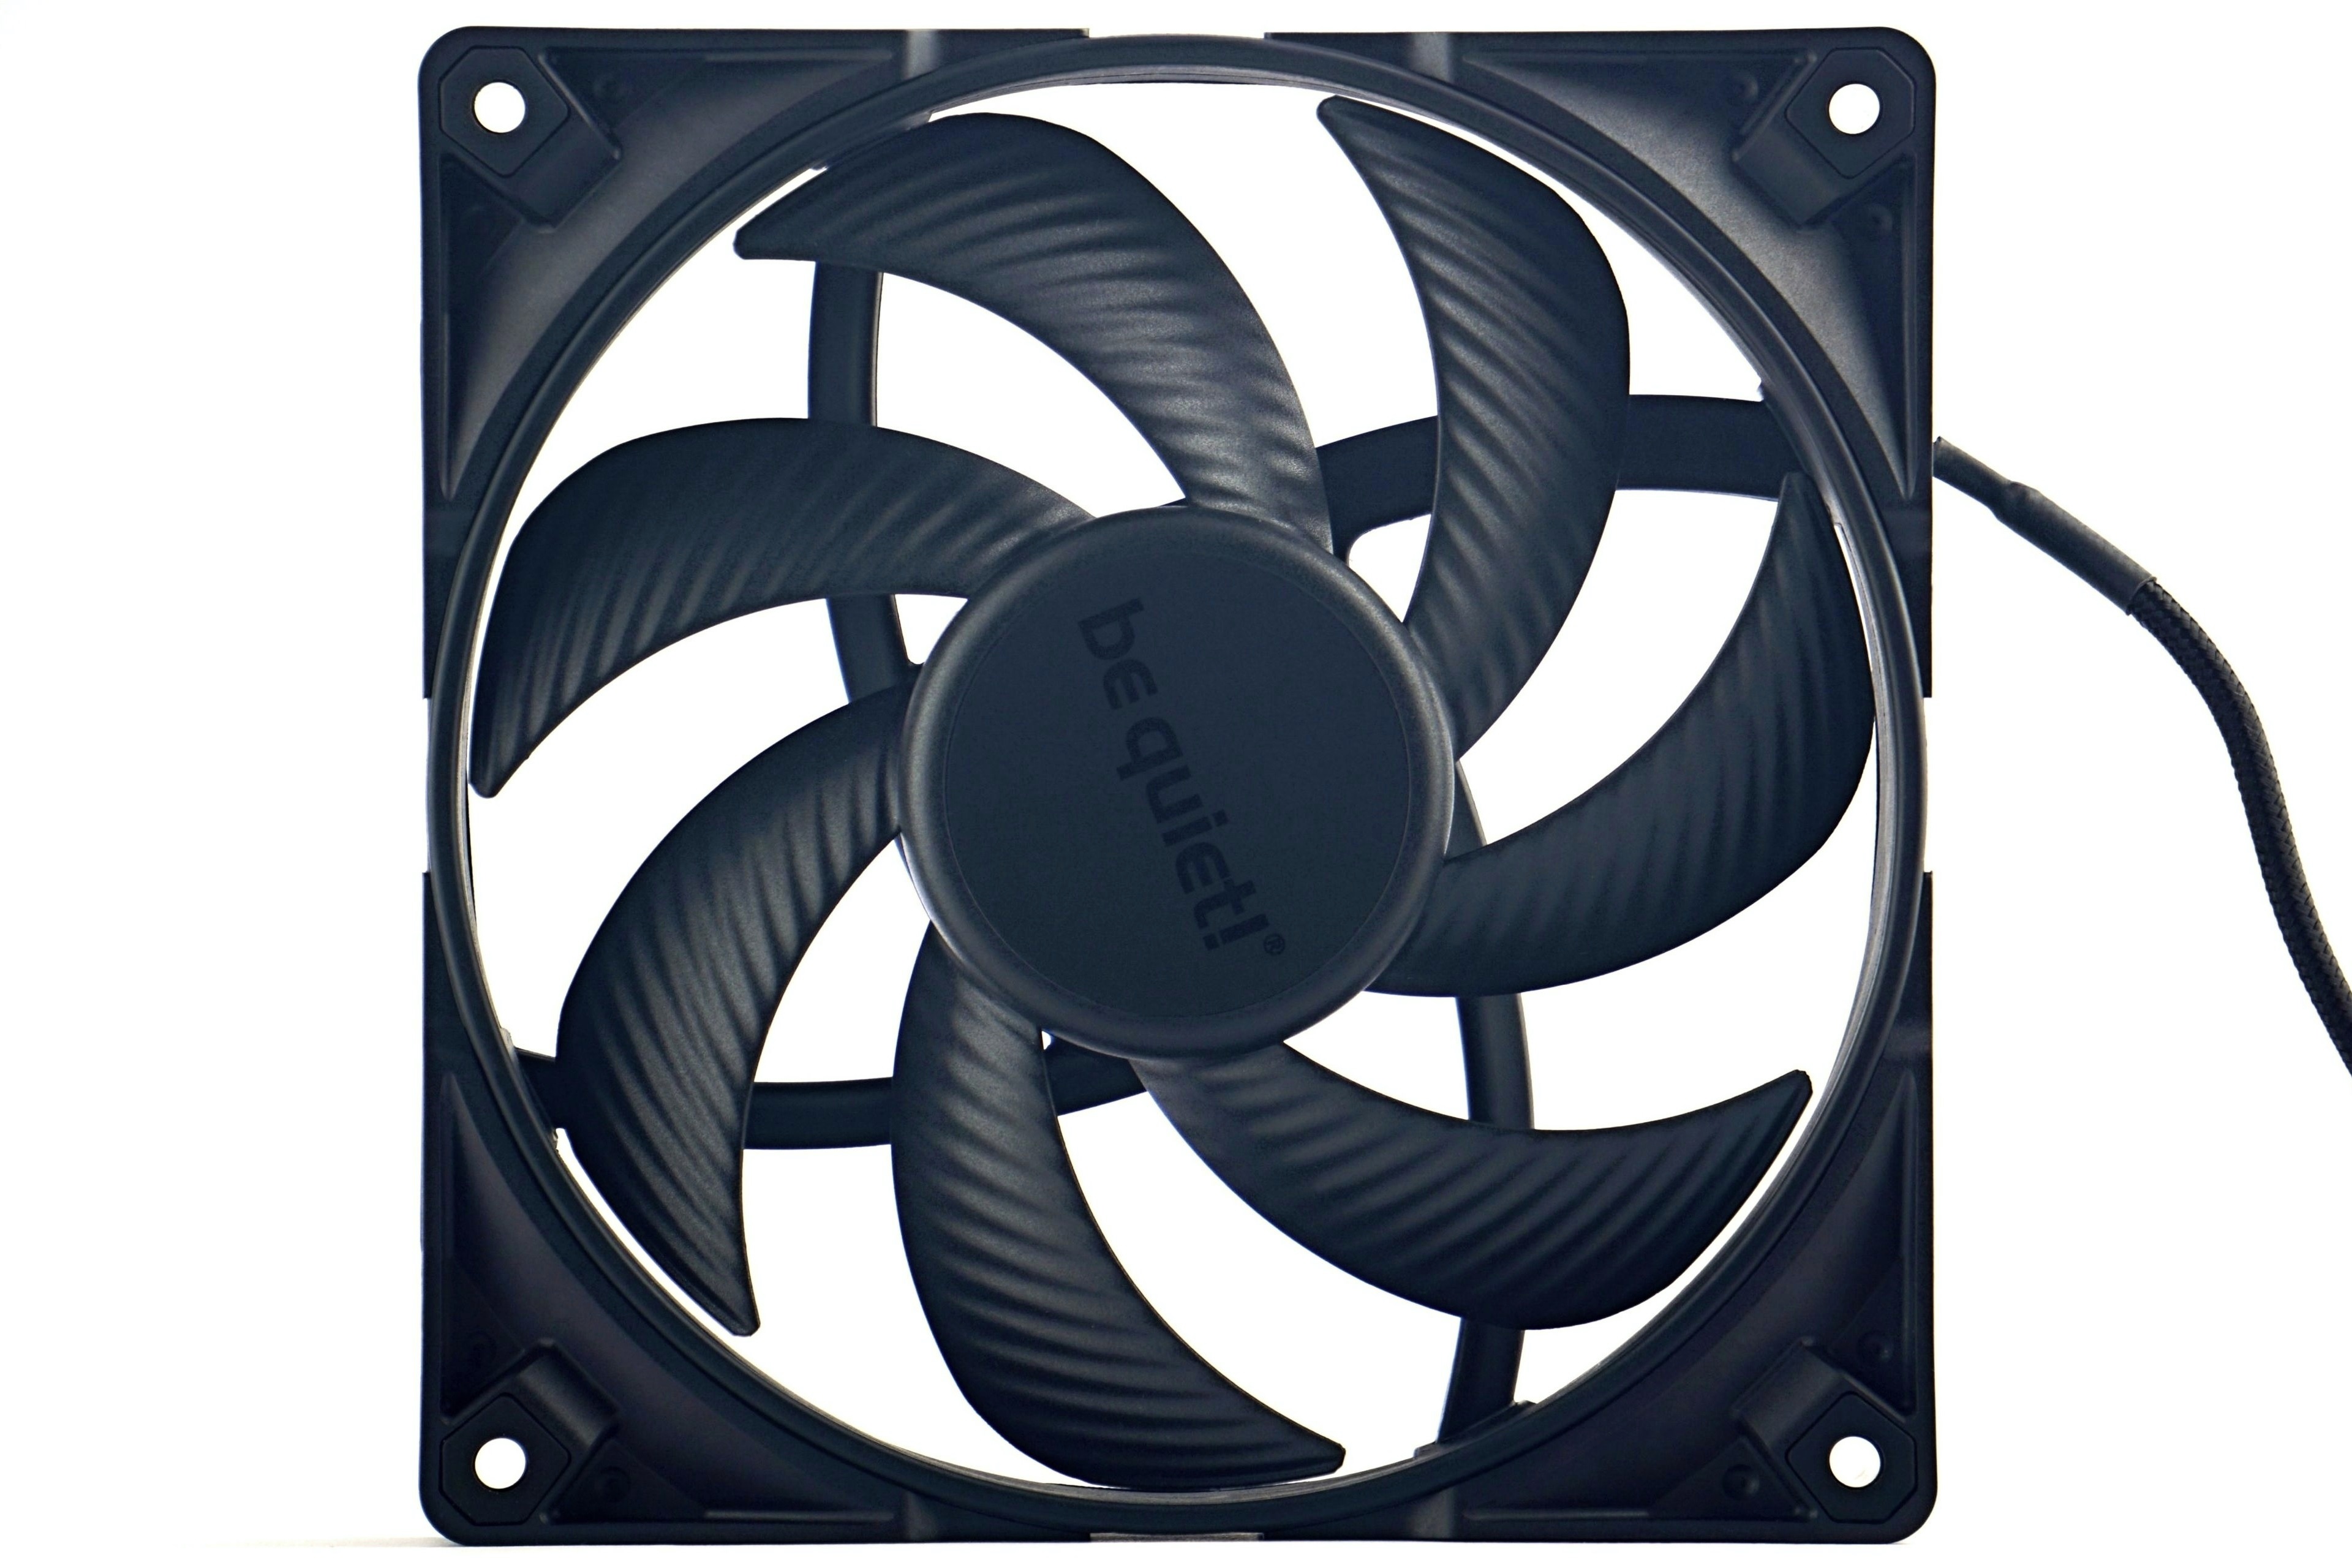
However, the 140 mm variant naturally has a larger outer cross-section by some 37% (i.e. the active one, with blades). Thanks to the larger blades, it achieves a higher air flow even at lower speeds, but the static pressure is already lower. The gaps between the blades are considerably larger than in the 120 mm model, where they (the gaps) are really cramped. In the case of the 140 mm fan, the relative distances, due to which the static pressure drops, between the individual blades are quite large. For longer blade lengths a higher airflow is achieved, but this is especially so in a non-restrictive environment which offers little resistance to the fan. This means that the airflow drops considerably faster due to the obstacle. The more complicated the obstacle is (in terms of constraints on the fan), the smaller the advantage of the 140 mm fan over the 120 mm variant.

The set of corners is the same across Silent Wings Pro 4 fan formats, and the 140mm also comes pre-installed with a radiator-optimized type. Only with these, there are no air gaps between the frames (fan and radiator), due to which the static pressure drops and the air flow (and therefore cooling performance) naturally decreases.
There are two types of interchangeable corners – standard” (from the ordinary Silent Wings 4 fans, without Pro in the designation), their application here makes basically no sense, and then “anti-vibration”. These can come in handy when installing fans in the case (for system cooling). Because of the complete rubber separation of the corners from the rest of the fan, they absorb vibration more effectively, although some of it still passes through to the case chasiis. This is typically through the contact of the fan tunnel with the grille. The tunnel is rubberized and also absorbs some vibrations, but with significantly less effectiveness. We have also addressed this issue (the effect of corners on the properties of the Silent Wings Pro 4 fan) in a separate article supported by measurement results.

In addition to the interchangeable corners (with better ones pre-installed), with the Silent Wings 4 fans with the “Pro” label, you also pay extra for a softer cable with a more robust connector attachment. And, of course, for a three-position switch to limit maximum speeds to about 1750 rpm (HS/High Speed) and 1020 rpm (M/Medium).
In the end position “UHS” (Ultra High Speed) the highest possible speeds are achieved, up to approx. 2215 rpm. A little more rpm is missing to reach the declared 2400 and perhaps because BeQuiet! lists them at a higher voltage (13.2 V?, which is unachievable in a computer) than 12 V. We are still waiting for a statement on this matter, and if we get an official statement, we will of course add it to the article. Either way, the speeds are always within the acceptable tolerances of ±10%, although here it’s the to the “minus” (about 7.7%).

| Brand and model of fan | Paper specicifations * | Price [EUR] | ||||||||
| Format (and thickness) in mm | Connecting | Speed [rpm] | Airflow [m3/h] | Static pressure [mm H2O] | Noise level [dBA] | Bearings | MTBF [h] | |||
| Motor | RGB LED | |||||||||
| BeQuiet! Silent Wings Pro 4 (BL099) | 140 (25) | 4-pin (PWM) | N/A | 2400 | 165.50 | 3.64 | 36.8 | fluid | 300 000 | 33 |
| Fractal Design Prisma AL-14 PWM | 140 (25) | 4-pin (PWM) | 3-pin (5 V) | 500–1700 | 176.44 | 2.38 | 34.1 | sleeve | 100 000 | 21 |
| Gigabyte Aorus 140 ARGB | 140 (25) | 4-pin (PWM) | 3-pin (5 V) | 800–1700 | 51.48–103.03 | 0.59–2.18 | 8.9–35.8 | sleeve | 73 500 | 28 |
| BeQuiet! Light Wings (BL075) | 140 (25) | 4-pin (PWM) | 3-pin (5 V) | 2200 | 121.82 | 2.30 | 31.0 | rifle | 60 000 | 29 |
| Fractal Design Aspect 14 RGB PWM | 140 (25) | 4-pin (PWM) | 3-pin (5 V) | 500–1700 | 33.98–132.52 | 0.09–1.93 | 10.0–35.5 | rifle | 90 000 | 18 |
| DeepCool FK120 | 120 (25) | 4-pin (PWM) | N/A | 500–1850 | 117.21 | 2.19 | 28.0 | fluid | N/A | 11 |
| Asus TUF Gaming TF120 | 120 (25) | 4-pin (PWM) | 3-pin (5 V) | 1900 | 129.12 | 2.50 | 29.0 | fluid | 250 000 | 14 |
| BeQuiet! Light Wings (BL072) | 120 (25) | 4-pin (PWM) | 3-pin (5 V) | 1700 | 70.53 | 1.66 | 20.6 | rifle | 60 000 | 26 |
| DeepCool FC120 | 120 (25) | 6-pin (PWM) | 6-pin (5 V) | 500–1800 | 105.19 | 1.83 | 28.0 | hydrodynamic | N/A | 20 |
| Nidec Servo Gentle Typhoon D1225C (2150/12) | 120 (25) | 4-pin (PWM) | N/A | 2150 | 117.23 | 2.87 | 30.0 | ball | 100 000 | 20 |
| BeQuiet! Shadow Wings 2 (BL085) | 120 (25) | 4-pin (PWM) | N/A | 1100 | 65.41 | 0.82 | 15.9 | rifle | 80 000 | 15 |
| Noctua NF-A12x25 PWM | 120 (25) | 4-pin (PWM) | N/A | 450–2000 | 102.10 | 2.34 | 22.6 | SSO2 | 150 000 | 28 |
| Corsair AF120 Elite (black) | 120 (25) | 4-pin (PWM) | N/A | 400–1850 | 18.52–100.41 | 0.09–1.93 | 31.5 | fluid | N/A | 24 |
| Cooler Master MasterFan SF120M | 120 (25) | 4-pin (PWM) | N/A | 650–2000 | 105.33 | 2.40 | 5.5–22.0 | ball | 280 000 | 33 |
| Akasa Alucia SC12 | 120 (25) | 4-pin (PWM) | N/A | 500–2000 | 95.65 | 1.94 | 33.1 | hydrodynamic | N/A | 12 |
| BeQuiet! Silent Wings Pro 4 (BL098) | 120 (25) | 4-pin (PWM) | N/A | 3000 | 142.50 | 5.31 | 36.9 | fluid | 300 000 | 32 |
| Thermalright X-Silent 120 | 120 (25) | 3-pin (DC) | N/A | 1000 | 61.31 | N/A | 19.6 | fluid | 50 000 | 5 |
| Fractal Design Aspect 12 RGB PWM | 120 (25) | 4-pin (PWM) | 3-pin (5 V) | 500–2000 | 22.09–95.14 | 0.23–2.34 | 10.0–33.2 | rifle | 90 000 | 16 |
| BeQuiet! Silent Wings 3 (BL066) | 120 (25) | 4-pin (PWM) | N/A | 1450 | 85.80 | 1.79 | 16.4 | fluid | 300 000 | 21 |
| Gelid Zodiac | 120 (25) | 4-pin (PWM) | 3-pin (5 V) | 700–1600 | 111.29 | 1.47 | 35.0 | hydrodynamic | N/A | 10 |
| Fractal Design Dynamic X2 GP-12 PWM | 120 (25) | 4-pin (PWM) | N/A | 500–2000 | 148.83 | 0.51–2.30 | 10.0–32.2 | rifle | 100 000 | 12 |
| BeQuiet! Pure Wings 2 (BL039) | 120 (25) | 4-pin (PWM) | N/A | 1500 | 87.00 | 1.25 | 19.2 | rifle | 80 000 | 11 |
| Gigabyte Aorus 120 ARGB | 120 (25) | 4-pin (PWM) | 3-pin (5 V) | 800–1700 | 31.47–69.40 | 0.37–1.48 | 7.3–28.6 | sleeve | 73 500 | 25 |
| Arctic BioniX P120 A-RGB | 120 (30) | 4-pin (PWM) | 3-pin (5 V) | 400–2300 | 81.55 | 2.10 | 33.4 | fluid | N/A | 21 |
| Akasa OTTO SF12 | 120 (25) | 4-pin (PWM) | N/A | 0–2000 | 164.84 | 3.59 | 7.1–31.7 | ball | 80 000 | 22 |
| Cooler Master SickleFlow 120 ARGB | 120 (25) | 4-pin (PWM) | 3-pin (5 V) | 680–1800 | 105.34 | 2.50 | 8.0–27.0 | rifle | 160 000 | 15 |
| Alphacool SL-15 PWM | 120 (15) | 4-pin (PWM) | N/A | 600–1800 | 71.40 | 1.20 | 32.0 | ball | 50 000 | 11 |
| Arctic BioniX F120 | 120 (25) | 4-pin (PWM) | N/A | 200–1800 | 117.00 | 2.10 | 20.0 | fluid | N/A | 10 |
| SilverStone SST-AP123 | 120 (25) | 3-pin (DC) | N/A | 1500 | 96.84 | 1.46 | 23.8 | fluid | 50 000 | 25 |
| Noctua NF-P12 redux-1700 PWM | 120 (25) | 4-pin (PWM) | N/A | 400–1700 | 120.20 | 2.83 | 25.1 | SSO | 150 000 | 13 |
| SilentiumPC Fluctus 120 PWM | 120 (25) | 4-pin (PWM) | N/A | 300–1800 | N/A | N/A | N/A | fluid | 100 000 | 12 |
| MSI MEG Silent Gale P12 | 120 (25) | 4-pin (PWM) | N/A | 0–2000 | 95.48 | 2.21 | 22.7 | hydrodynamic | 50 000 | 31 |
| Asus ROG Strix XF120 | 120 (25) | 4-pin (PWM) | N/A | 1800 | 106.19 | 3.07 | 22.5 | „MagLev“ | 400 000 | 23 |
| Akasa Vegas X7 | 120 (25) | 4-pin (PWM) | 4-pin (12 V) | 1200 | 71.19 | N/A | 23.2 | fluid | 40 000 | 11 |
| Reeven Coldwing 12 | 120 (25) | 4-pin (PWM) | N/A | 300–1500 | 37.54–112.64 | 0.17–1.65 | 6.5–30.4 | sleeve | 30 000 | 12 |
| Reeven Kiran | 120 (25) | 4-pin (PWM) | shared | 400–1500 | 110.10 | 2.95 | 33.6 | fluid | 120 000 | 17 |
| SilentiumPC Sigma Pro 120 PWM | 120 (25) | 4-pin (PWM) | N/A | 500–1600 | 79.00 | N/A | 15.0 | hydraulic | 50 000 | 7 |
| SilentiumPC Sigma Pro Corona RGB 120 | 120 (25) | 4-pin (PWM) | 4-pin (12 V) | 1500 | 56.58 | N/A | N/A | hydraulic | 50 000 | 12 |
| SilverStone SST-AP121 | 120 (25) | 3-pin (DC) | N/A | 1500 | 60.08 | 1.71 | 22.4 | fluid | 50 000 | 18 |
| SilverStone SST-FQ121 | 120 (25) | 7-pin (PWM) | N/A | 1000–1800 | 114.68 | 0.54–1.82 | 16.4–24.0 | fluid | 150 000 | 20 |
| Xigmatek XLF-F1256 | 120 (25) | 3-pin (DC) | N/A | 1500 | 103.64 | N/A | 20.0 | rifle | 50 000 | 16 |
* When reading the performance values, a certain tolerance must always be taken into account. For maximum speeds, ±10% is usually claimed, minimum speeds can vary considerably more from piece to piece, sometimes manufacturers will say ±50%. This must then also be adequately taken into account for air flow, static pressure and noise levels. If only one value is given in a table cell, this means that it always refers to the situation at maximum speed, which is achieved at 12 V or 100% PWM intensity. The manufacturer does not disclose the lower limit of the performance specifications in its materials in that case. The price in the last column is always indicative only.


seems it’s a great case fan, but when impedance grows A12x25 gets the edge… yep, the smaller format made as universal design wins both in airflow and static pressure when there’s a thick rad in use
that’s nuts and no wonder Noctua takes ages to release the new 140mm and they aren’t even gossiping about new 120mm
Pardon my ignorance, but I don’t understand why you said that the Noctua A12x25 “gets the edge”? I’ve only looked at the chart on this page, which shows that the BL099 has better AF and SP than the Noctua, the BL098 has better SP than the 99, and the Fractal Design Prisma AL-14 PWM also beats the Noctua. Sorting the data on SP, then AF, then dB, the A12 is in 7th place. Sorted by AF, then SP, then dB, it’s in 9th place, and sorted by dB, then AF, then SP, it’s 17th despite having lower max. RPMs than 6 others. Yes, the A12 is a great fan, and I have 3, but it’s not the best. The Phanteks T30 isn’t on this list but it defeats it handily. So, please educate me as I really want to know.
you are looking at the industrial noise levels that nobody wants in their end-user setup
I’m talking about the actually acoustically usable range that’s even lower than the tests seen here, but as the noise goes down yo can see A12x25 getting better and better
and T30 can’t compete in that range either
if you want performance at all costs there’s no point talking Noctua or beQuiet!, you just grab a Delta in these cases
I consider it appropriate to correct a bit the comparison of our test modes to industrial noise levels.
We’ve had this discussion before and I absolutely respect that, for example, the 120 mm BeQuiet! Shadow Wings 2 doesn’t do it for you even at ~490 rpm (i.e. 31 dBA), because you would like even quieter operation. But from the point of view of most, it will be super-quiet, at the limit of audibility, even in the quiet of the night, a little away from your ears, outside the case.
While the measured values of air flow and static pressure can be confronted with the paper parameters of the manufacturers, this is not the case for the noise level. Here I measure completely differently, from a much shorter distance and even with a parabolic amplifier for more sensitive and higher resolution recording. The claim that even our quietest mode is too noisy is therefore, in my opinion, quite misleading. But again, I understand you have a very sensitive ear, but after your interpretation, another user will form a different picture of the noise of this or that fan as significantly noisier than it really is, I think. 🙂
Our 31 dBA mode is so quiet that several fans can’t even be slowed down to reach it. Sometimes because of the noisier motor or bearings (but their sounds are limiting even for even lower noise levels), sometimes because of unreachable speeds (the minimum possible fan speed is noisier).
But I believe that one day it will come to that and we will select a few suitable fans to compare with each other at a noise level that you consider tolerable. What fan speeds are OK for you? We could then optimize the noise level based on these.
A12x25 sitting in the case under my desk works fine at 600RPM, since I have only a single one of these can’t really talk about unit to unit variance, but I’m expecting these to have pretty consistent quality
I wasn’t able to set up full width Kaze Flex 800 shipped with Ninja 5 to be silent, though back then I had a different PWM controller so it’s possible that at some lower point that’d work, but the performance would be so insignificant it doesn’t make a real difference anyway
I also tried using S12A to improve airflow in the case, unfortunately this one was capped at around 400RPM basically moving no air at all (and certainly much less than A12x25 at 600RPM)
besides that I have B12-PS that indeed has a really nice sound profile of wings, possibly even better than A12x25, but the motor itself is really whizzy, honestly I’m not sure what were the speeds, but the motor is audible basically from the start and only fades out when the wings noise becomes a concern for me
besides these 120mm fans I had also the very-non-standard 135mm Silent Wings 3 used with Dark Rock 4 and this was fine up to around 450RPM
obviously when we start to measure up these there may be some inconsistencies, partially coming from different placement in the case, different heatsinks used, possibly also from the natural difference of my hearing from the “standardized” A-function, giving different dB(A) values for each of these fans, but I’m hoping it would be at least something that can be reasonably averaged
regarding the noise target at around 30dB(A) it’s perfectly fine for shared spaces, often even private rooms at office buildings as the ambient noise is so well mixed our mind interprets it as a silence and even low quality fans are rarely noticeable when running slow, it may not be exactly “industrial” but isn’t anywhere near the personal, calm home office person looking up this stuff may have
after all these shared office machines are mostly pre-built and nobody bothers with replacing these fans, which, again, isn’t a big issue when these machines aren’t pushed to their limits and the office is full of people, though at times when I was the first one in the morning I could easily tell who left their PC on and who shut it down
noise pollution coming from laptop or “SFF-workstations” use in these shared spaces is another topic, it would be nice to get it resolved legally, but I’m not holding my breath
Thanks, I am noting 600 rpm NF-A12x25, at which we will measure the noise level and then normalize the selection of other fans according to it.
“regarding the noise target at around 30dB(A) it’s perfectly fine for shared spaces, often even private rooms”
Sure, but you can’t contrast the 30 dBA quoted for office noise with our 30 dBA for fan noise levels. They are incomparable because they are measured in completely different ways. We measure from a very short distance and we use a parabolic collar around the sensor for the highest resolution. Believe me, a fan in our 39 dBA mode will not make big noise in a “30 decibel” office. 🙂
It’s same with my airflow test.(But more inferior wind tunnel and noise normalization bench) be quiet! SW4 Pro 140mm shows relatively lower noise-normalized airflow when they are applied to high impedence environment.
I did test this fan with other 15 140mm fans on 3 appilcations(Radiator Push, Radiator Pull, Radiator Push + Front Filter). SW4 Pro showed the efficiency of ceiling for Radiator(30T thickness) Push test, but it is not better than other products when it tested on Radiator Pull and Radiator Push + Front Filter.
Thanks for the most detailed review for fans!
Your work on Quasarzone is perfect. From a certain level upwards, improvements in methodology (with a better tunnel or more precise equipment) do not affect the results too much. As long as for the same fans, across different methodologies, the authors arrive at similar conclusions, then everything is fine, full-fledged. 😉
Oh, I’m surprised you already know about my airflow test on Quasarzone!
(Of course, I’m not QM오즈, unlike me, he has very good anemometer, anechoic chamber and noise meter.)
I’m now using a small vane anemometer(~63mm) so that only a relative evaluation between fans is possible in my test. And noise meters are low-priced and anechoic chamber is not built. (I have no test lab and enough budget🤣)
There are some exceptional results, but It is fortunate that the results are similar with yours nonetheless.
I am joining in the attempt to provide accurate data to the public on fans, but I’m working part-time with two teens, so my budget is limited. I’m smart, and analytical due to my background in programming and systems analysis, but I’m no engineer.
I’ve already devised a test that indirectly indicates static pressure and airflow (although I have NO idea how to calculate them), as well as showing which are best for intake and which for exhaust. I tried the ProtMex PT6252B to get temp (WB, DP & ambient), relative humidity, air speed and airflow, and it even allows me to enter the area (not cubed, though), but I have repeated observed erroneous spikes when testing at different speeds (min and max are all I know how to accomplish at this time, so tips are appreciated). I do a simple, open-air noise test with my phone but I need to improve it so it actually reflects what the end-users will experience instead of what they’ll experience with it blowing in their ear from 15cm away! ;P
I’m really trying to figure out what to use to test. hotwire (e.g Testo 405i), tiny fan (e.g Testo 416), Pitot (e.g. Reed Instruments R3001), or something else. I feel that the ProtMex has too much resistance to low windspeed.
I have so much to learn! I read with great interest the fantastic way that HWC does testing. I will have to go to Quazarzone to see what you’ve got there, too.
I would greatly appreciate any advice you two can provide!
Thank you! Gamsahamnida!
It is nice to see a new fan tester!
To obtain an airflow(air volume) accurately, designing a wind tunnel is necessary. It standardizes the measurement of an airflow for every fans. Without a tunnel, due to a wind which is pushed by a fan has a characteristic of a turbulance, it is impossible to measure an ‘average’ air speed accurately. Without a wind tunnel, the air speed of the specific position can be heavily affected by other turbulances(increasing the gap between Min and Max), and can show different results for fans which are tuned to make the same airflow but with a different blade design(related with a straightness of wind).
Figure: https://img2.quasarzone.com/editor/2021/06/29/e6c2aa0e602dbae86a8d74a0112d727b.jpg
The point is getting a mean air speed passing the specific cross-section area.
(Note that =∫vdA/∫dA, : mean air speed, ∫vdA: air volume, ∫dA=A: cross-section area)
Building wind tunnel like Figure allows to get easily, and ∫dA should be area of a vane of an anemometer. So the air volume we want can be obtained by simply multiplying them: ∫vdA=∫dA=A
But to do this calculation, an anemometer with vane is needed and it should be connected with a duct. The products you quoted(Testo 405i and Reed Instruments R3001) can show wind speed v at specific position in a duct, but not the average value . Even though they offer the function to automatically multiply wind speed and duct area to get a rough value of , there is no guarantee that the result is the same as the actual . Even inside of a duct, air speed can be differ depending on the location on the cross-section.
So, the anemometer with a turbine is the best choice for this usage, but I recommend the meter with larger vane.
My lastest tests are here, they are not that precise as HWCooling’s test but useful for you:
https://quasarzone.com/bbs/qf_cool/views/365052
QM오즈’s the vast benchmark has quiet good measurement device and enviroment, check it out:
https://quasarzone.com/bbs/qc_bench/views/74139
L’ubomir,
Thank you for being the 1st person to subscribe to my new tech channel! Right now, there’s not much there and, as I’m sure you understand much better than do I, it’ll be a while before I have reviews to share, especially since I’ve encountered a lot of technical issues (including my spreadsheet misbehaving in multiple spreadsheet programs), and I’m still learning.
ThermalLeft,
Thank you for responding!
Ah, you’ve broken my head with math! 😉 I enjoy science and analysis, but math is my weakness. I stopped after advanced maths because I would forget much of what I had learned right after a term or semestral test. Thank you for the equations and, aside from the odd symbol, it seems to be simple algebra; is that right?
My wind tunnel is sheet metal in a cylindrical shape, 8 inches in diameter by 2 feet in length, with a modified cap at one end to hold a fan, and a hole about 15 cm away in the side of the tunnel to admit the ProtMex anemometer I’m trying. Since I don’t test noise in it, I have no need of a less vibrational material. I can add padding to the cap to mitigate vibrations and noise, if needed, at the seam and/or the fan hole. Fans fit in it very snuggly, so I’m not worried. I haven’t yet determined what to use at the far end to encourage pressure build-up. I’ve seen your picture before – it was shared in a small discussion I started with others on LTT forum, and this site came up repeatedly. I have both nylon mesh and a metal plate with small holes in it as obstructions; I hope to find a radiator and/or heatsink to use, too. Maybe I should cut up and glue together straws?
I have recently purchased over 20 fans, some are famous while others are very cheap.
One person, who is an HVAC expert who designs and commissions HVAC systems, has recommended hotwire tech to me, as he feels it’s the best, and doesn’t like vanes. I feel like, perhaps, the tiny vane of either 416 variant is better than large one because it allows me to position the vane at different points in the air current, which will give me a better average, if that makes sense. However, I’d be happy to discover a large vane option with low wind resistance to measure low RPMs. Since HVAC is not strictly analogous to PCs (empty chambers vs ones full of obstructions), this means he can only advise me so much, and I greatly appreciate his input, even if he has no experience testing computer fans.
So, I’d also like to test SP. My budget is quite limited, so I’m hoping to find either an all-in-one, or an anemometer and a separate manometer that I can connect multiple sensors to get a fan curve from.
Would you please provide a link to a turbine anemometer? Why do you recommend the larger vane instead of the tiny one?
Do either of you make videos of this type of work?
Thanks for teaching me!
Sorry for the confusion due to wrongly displayed mathematical symbols. Angle brackets are not worked.
Anyway, you don’t need to calculate the integral ∫vdA. I just used the expression to make things clear. All you need is to obtain an average speed along area from an anemometer with turbine and to multiplying it with the area of vane. Very simple: ∫vdA (air volume) = v’ (mean air speed along area) * ∫dA (area of vane)
It seems you already builded your own wind tunnel. But you may need to move the anemometer to outlet of the wind tunnel. If my understanding of your explanation is correct, the distance between the anemometer and the position for mounting fan is ~150mm, and, it is too close in my opinion. As explained earlier, the airflow pushed by a fan is a strong turbulance, not a laminar flow. You may observed the ‘bounce’ in measured wind speed values because of this reason. It is good to keep some distance(500~1000mm or 20~40 inches) and place flow straightener in a middle of duct if possible.
If you want to use a radiator as obstacle, you need to make the part connecting a radiator and wind tunnel. Using the actual radiator is recommended, because the result of straws bundle and a radiator can be different. The frame design of fan espeacially affects the efficiency for a radiator. Square frame shapes tend to be more efficient on a radiator. It would be nice to be able to reflect these differences in your test. You can easily find a cheap 120mm 1-row radiator on Aliexpress.
On the other hand, applying am air cooler heatsink to a wind tunnel is very hard work. Placing thin aliminium fins(0.4~0.5T) with constant gaps(1.6~3.0mm) and cutting fins into proper size will be not easy things. Also, the side of heatsink and the connection between a heatsink and a tunnel should be sealed to prevent leakage of wind. I am thinking about how to easily make a heatsink for testing.
Meanwhile, to obtain better speed value with your methods, I suggest measuring at as many points as possible in one section area. Then, you’ll get v1, v2, v3, … , vn for each positions and can get the approximate average air speed along duct area, calculating v’=(v1+v2+v3+…+vn)/n. Of course, this can take more time to measure speeds than the options with larger vane.
Currently, I’m using BTMETER BT-856A. It is ~68$ price and has ~63mm(or 2.5 inches) vane. It has not that large turbine, but still much bigger than other cheap meters. And it also has extension USB cable. It allows me to test fans very conveniently.
More detailed infos are here: https://coolenjoy.net/bbs/review/596660?p=11
This is QM오즈’s work. The article has good explanation about fan airflow test.
By the way, I have the plan to make videos about my fan test, but it will be take looong time. 😊
The symbols weren’t the problem – math is just difficult for me. What is the formula to calculate the area of a vane?
I was thinking that I would need to cover the end of the tunnel with mesh or something so that it better simulates a case by holding pressure. Do you happen to know the standard distance used to check airflow at one position?
Even though the airflow is turbulent, there is still laminar flow along the wall of the tunnel, which is why I decided to build a wider one to minimize that problem. There’s nothing I can do about turbulence other than that, too, aside from adding in the airflow “straightener”.
I’m planning on finding a large radiator (in excess of 8″x8″) to simplify the matter. I am also considering cutting a viewing port in the wall and placing crepe paper to show the airflow, although I’m not sure if this is useful without a paper with a scale on it on the far side, nor am I sure where it would be best to place it and how much it’d distort the results. Do you have any thoughts or suggestions?
Since my tunnel is 2 feet (24 inches, which is perhaps 61 cm), how many holes do you suggest I bore into it. If I do that, I will have no choice but to use the tiny vane anemometer since it would not be a good idea to punch large holes for a large vane to fit through every few inches. Aside from the challenge of sliding doors for them, I’d also be adding turbulence to the tunnel. So, if I understand you correctly, I should either do that, or use a large vane at the end of the tunnel? I could very easily place the fan cap at the opposite end of the tunnel, which would mean that the hole would then be 15 cm from the far end of tunnel instead of from the fan. Would that be good?
How is the accuracy of the BTMeter? I should receive my replacement ProtMex tomorrow, but I am doubtful that it will perform better than the first one, so I really need to find another option, as well as find a manometer with multiple sensors that I can affix to the tunnel. I wonder if they should be in a straight line or if it would be better to stagger their positions so as to prevent false readings in sensors that are in the wake of previous ones…Thoughts?
Regarding heatsinks, I figured out a simple method to evaluate pressure without measuring it. All you have to do is attach a fan to either side of a single-tower air cooler and monitor the CPU, mobo, VRM and GC sensor readings, which I do with HWInfo64, and derive the average temperature. I do this in BIOS (with the BIOS readings) as a control, then I do it in Windows with a light load, followed by a heavy load using the 3DMark Speed Way benchmark. By placing the fan on each side, I also discover which fans work best as intake and which as exhaust. I also combined similar and different fans on each side to see how they’d work together. It seems that it’s best to have the stronger fan (if it’s a dislike pair) on the right side. For this procedure, my first run employed the Noctua NH-U12A, and the fans: Noctua A12x25, Phanteks T30, Corsair ML120 & SP120 RGB Elite. I’m sure you can guess which was best and worst on exhaust, but the results under a light load for intake were not what I’d expected. I have had many problems with spreadsheet program malfunctioning, so I’m still not done making graphs. >:(
I will read QM’s work. I was also pointed to this article by another person in my discussion: https://www.overclock.net/threads/ways-to-better-cooling-airflow-cooler-fan-data.1491876/
Yesterday, I had the good fortune to meet a woman who does video editing, and she may decide to help me after she graduates in a few weeks. We shall see.
Hey, ThermalLeft, are you ok? Haven’t heard back from you for a while now.
Oops, there are some problem in formula.
Edit:
v’=∫vdA/∫dA : mean air speed, ∫vdA: air volume, ∫dA=A: cross-section area
So, ∫vdA=v’∫dA=v’A
I wrote v’ as, left angle bracket + v + right angle bracket before.. I didn’t know that it makes some errors.
I subscribed to your YT, TL.
I got the replacement ProtMex PT6252B today. It’s also defective. The vane’s rubbing against something, could be in the hub or against the ring. The only thing that prevents it is if the vane is at least parallel to the ground, if not tilted forward (screenward), so I’ll be returning this one, too.
ThermalLeft, I had considered the BTMeter you have because it’s got the handheld vane, but it didn’t have some features that I was looking for. I just looked and there are some bad reviews of it (a minority of reviews), a few of which mentioned how difficult it is to open the battery compartment, inaccuracy, etc.
If I understand you correctly, you recommend a large vane meter but a tiny vane would be good, too, especially if I take readings at multiple places.
What is your feeling about a hotwire anemometer?
It is nice to see a new fan tester!
To obtain an airflow(air volume) accurately, designing a wind tunnel is necessary. It standardizes the measurement of an airflow for every fans. Without a tunnel, due to a wind which is pushed by a fan has a characteristic of a turbulance, it is impossible to measure an ‘average’ air speed accurately. Without a wind tunnel, the air speed of the specific position can be heavily affected by other turbulances(increasing the gap between Min and Max), and can show different results for fans which are tuned to make the same airflow but with a different blade design(related with a straightness of wind).
Figure: https://img2.quasarzone.com/editor/2021/06/29/e6c2aa0e602dbae86a8d74a0112d727b.jpg
The point is getting a mean air speed passing the specific cross-section area.
(Note that =∫vdA/∫dA, : mean air speed, ∫vdA: air volume, ∫dA=A: cross-section area)
Building wind tunnel like Figure allows to get easily, and ∫dA should be area of a vane of an anemometer. So the air volume we want can be obtained by simply multiplying them: ∫vdA=∫dA=A
But to do this calculation, an anemometer with vane is needed and it should be connected with a duct. The products you quoted(Testo 405i and Reed Instruments R3001) can show wind speed v at specific position in a duct, but not the average value . Even though they offer the function to automatically multiply wind speed and duct area to get a rough value of , there is no guarantee that the result is the same as the actual . Even inside of a duct, air speed can be differ depending on the location on the cross-section.
So, the anemometer with a turbine is the best choice for this usage, but I recommend the meter with larger vane.
My lastest tests are here, they are not that precise as HWCooling’s test but useful for you:
https://quasarzone.com/bbs/qf_cool/views/365052
QM오즈’s the vast benchmark has quiet good measurement device and enviroment, check it out:
https://quasarzone.com/bbs/qc_bench/views/74139
Hello L’ubomir and ThermalLeft! I hope you’re doing well! I just wanted to update you both. I have received a Bonvoisin vane anemometer for $107. https://www.amazon.com/dp/B09YLZS5B3?ref=ppx_yo2ov_dt_b_product_details&th=1 They had recommended their hotwire version to me, but that’s $80 more and I wasn’t sure of the quality of their products. I have only performed initial testing but, so far, it seems promising. Unlike the ProtMex, which used a design that introduced too much resistance of the vane to movement at low airflow, and also had erroneous readings, this one is different.
The vane is mounted on a shaft but, unlike the ProtMex, it doesn’t drive the shaft, which makes it sensitive to even a slight puff of air, but the design of the blades is such that the vane RPM don’t increase quickly. There is something that registers the movement of the vane. The blades are set at 45 degrees and perfectly flat, making it possible to measure with either side of the vane. It measures air flow and velocity as well as temperature, but not humidity. As with the ProtMex, it only accepts 2D measurement of space for flow, not m3, which is disappointing. The vane is mounted on an extensible telescoping rod with the data cable traveling through the middle for a total length of 1.5m, and it connects to the right side of the meter. You need 2 hands to use this unless you can set down the meter or put it on a tripod (using a magnet isn’t possible as it’s non-ferrous). There are other features, although some of it involves math (ouch), and you can even connect the meter via a micro-USB port at the top to a computer (as old as Windows 98!), and it has its own software. It offers English, Simplified and Traditional Chinese. The meter is housed in a protective plastic case that can be removed to replace the 4 AAA batteries. The display is large and the readings are easy to read, although feature indicators are too small for my eyes. There is a backlight for it. The tripod mount hole is on the back. They state that it’s certified by CE, ROHS and FCC, although a copy isn’t provided with the unit. One concern I had is that I noticed the temperature creeping upwards while testing, which makes me think that either it’s mounted in the vane near an area that generates heat (such as the shaft), or it is within the meter, in which case my hand’s warmth may be affecting it. I just tried again and it definitely seems to be generating heat within the vane as the temperature had already increased by .5 degrees C in the first minute and another .2 degrees C after that (it seems to have stabilized). I imagine that a stronger fan will result in a higher temperature change. So I surmise that the vane is mounted without bearings (or cheap ones) because of the temp increase as well as the noise I can hear. This means the temperature reading while in use is not valid. One interesting note about this is that when I increased the velocity by 1 m/s (from ~.98), the temperature dropped 1 degree. I then lowered the velocity to ~.52, and the temperature slowly regained that 1 degree. This confirms that the heat is generated in the vane and once the velocity is strong enough the temperature drop will counter the friction-heat. I have other ways to measure temperature, so this is not that important to me, but I have no way to determine how much drag there is. I don’t yet have a tachometer to see which of the RPM readings from BIOS, Asus Armoury, HWInfo64 and my Akasa FC.Trio are the most accurate, so I’ll have to take them all and figure out what is correct. Any suggestions? The only con I’ve noticed so far is that it doesn’t display readings in a smooth manner; there is a delay of a few seconds between readings (I can hear the increase in RPM before I see the meter registering that change), which is inferior to the ProtMex. Since I’ve only done preliminary testing (and had a fun contest with my son to see who could make the vane turn the fastest, which I won), I cannot yet advise about its accuracy.
Once I understand better if this anemometer is accurate or not, I’ll update here. I’ve left Bonvoisin a question about the heat production.
I’ve also purchased sound-dampening foam and a Thermaltake Core V1 case, which I will use for my sound testing chamber (to be built). I was wondering about the advisability of leaving the area around the microphone unpadded if I design it in such a way that it bounces soundwaves back towards the microphone. I feel that this might be more representative of the user’s experience and, since I cannot use a mic collar like L’ubomir, I am hoping that this will be an acceptable substitute. Please give me your feedback.
I was looking for further information on measuring static pressure and came across Oriental Motors, which I was surprised to discover makes fans, and they explain about their fan testing, so I wanted to share this with you. I hope it will be interesting, or perhaps useful. https://www.orientalmotor.com/cooling-fans/technology/cooling-fans-how-to-measure-air-flow.html
I see now that I really need to make my wind tunnel have 2 chambers in order to best measure pressure. Unfortunately, I don’t have a 3D printer, so I will have to fabricate it by hand.
I just wanted to write that I register the comment, but I can’t (due to busyness) express myself to the extent it deserves. But I will come back to it later. If by any chance I have forgotten, please remind me. 🙂
Hello, L’ubomir. Just a reminder… 🙂
Hello Glenn,
I’m still on it. Just give me a little more time, please. I should have a little less work in June (and more time for such discussions). Now I still can’t tear my attention away from all the tests, including graphics cards. The information embargo on RTX 4060 Ti ends on May 24th and the RX 7600 only a day later… it’s a carnage. 🙂
Sorry for the absence of response recently. I have been so busy lately that even didn’t access this forum.
It seems you are doing well on your development. So did you make some measured results about fans? i’m curious about it.
I’ll take it from the bottom.
You don’t need a dual chamber wind tunnel to measure static pressure. The scheme you refer to meets the ACMA 210 standard as well as, for example, Longwin. This is a device that is also used by many fan manufacturers to measure parameters. The advantage of the ACMA 210 is that it can simulate zero static pressure conditions for airflow measurements and you can measure static pressure as well. Static pressure can also be measured in other ways. In order to confront the results with the manufacturer’s specifications, the basic condition of zero airflow and a number of smaller details must be fulfilled, which are probably not worth discussing now – I would be needlessly giving you a headache. Personally, I wouldn’t get too hung up on static pressure measurements, the data is not that useful in practice. Yes, we do measure static pressure because I am interested in it from a scientific point of view, finding various correlations and studying how fans behave in an environment with enormous resistance, or what impact increasing resistance has on the motor performance (which is also associated with a decrease in airflow in high-restrictive systems), which sooner or later we will be dealing with in detail in thematic articles.
It might be worthwhile to invest the time spent on static pressure measurements into airflow measurements with a higher-than-standard number of obstacles at different orientations (push/pull). A number of nylon filters with different fineness, different grilles (in shape and degree of perforation), radiators with the same FPI but with different thickness – all this would be more useful in practice than static pressure measurements, unless you are looking to create P/Q curves, which are quite misleading. For example because they do not account for noise in any way. The latter is slightly different for each fan at the same resistance of a given obstacle.
The fact that the anemometer does not show you the result “3D” (in m3/h or CFM) but “2D” (in m/s) is fine, ours does not do it differently. You have to calculate the cubic units according to the airflow velocity using Bernoulli’s equation. The Bonvoisin anemometer looks good, don’t forget to check the constant air temperature during the measurement. And not only that. Measuring fans requires a lot of control over the whole test environment and now I mean this in the context of the design characteristics of the whole measurement system, which is based on a wind tunnel. In short you have to get it to a stage where you know exactly “what’s going on”, where unfortunately not even many reviewers with a lot of reach have got to. I can however recommend the YT channel Computer Tech & More Reviews, where fans are analyzed by an aerospace engineer and it’s worth it. The presentation format is weaker, which is one of the reasons why it probably won’t appeal to a wide audience, but there is a strong expertness component.
Thank you so much for your response! At another time, please explain “the basic condition of zero airflow and a number of smaller details must be fulfilled”. I am happy to learn!
You say that static pressure is not important, yet many volunteers and reviewers refer to, measure and rely on it. It is used as the primary indicator of how well the fan will move air through an obstruction. Now, I understand that I can also deduce that quality by running each fan through a barrier and observing the difference in temperature, noise and airflow, but I’m at the point where I’m thinking of making an actual water manometer, too.
As for airflow, I have already purchased a range of barriers, although I lack a radiator and heatsink (but I have my Noctua U12A, Thermalright PA120 and an Akasa Soho that I can utilize). I don’t want to make P/Q curves. I have no expertise in maths, having learned long ago that my native ability requires substantial daily support to maintain it above that level, and the level that I probably need for air dynamics is probably at the point at which I much not only support it but also at which I tend to forget math quickly (which has become even worse now that I’m in my 50s). ThermalLeft, whom I hope is okay, gave the Bernoulli equation but I’m afraid I’m confused by it. I need a real example to help. I’m afraid I offended them when I said that BTmeter isn’t good quality. 🙁
The Bonvoisin looked good but, sadly, it failed while I was testing fans, so I returned it. I have a Reed Instruments R4500SD (hotwire) and, while it is very accurate, it ONLY checks the ambient temperature and air velocity. The interface is not user-friendly or well-labeled. It has quite a long telescoping probe and cable (1.5m), and does datalogging to an included 16GB micro-SD with adapter. The kit, which I got for a really good price, also includes 6 AA batteries, a hard case and a 110/220V power supply (which I honestly prefer). As far as accuracy is concerned, increasing speeds are not as rapid (I think) as with a vane, which I’m sure is because it’s having to constantly adjust the hotwire temperature and measure it, but the delay in readings from it are very low, unlike the Bonvoisin, which had a delay of a few seconds (apparently the cable is inferior since the vane’s rotation seemed to have almost no drag, unlike the ProtMex) and displayed anomalous readings (which was even worse with the ProtMex). When the airflow decreased, there was a significant delay in readings, also I presume because it’s a hotwire. Because the thermistor is millimeters away from the hotwire, they don’t interfere with each other, so I get a more accurate temperature reading than those with the thermistor inside the handheld case. You can keep the hotwire closed while checking temperature or open it so both operate simultaneously. The hotwire does not have the ability to measure to 0, even when it is fully covered by the tight-fitting sleeve, and the variance range is +/- 5% of the reading +20 fpm, which seems rather a lot. Mine shows about ~.32 when closed. I like that I don’t need special software other than a spreadsheet program, but instead of a handy USB port on the device, there’s an RS232 port, and no data cable is included for real-time data transfer. Accessories, perhaps unsurprisingly, aren’t cheap. Then again, the Extech 300 series offers an adaptor to increase the capture size to 200mm from the vane size of 101.6 mm, and costs more than the meter itself, which I think is unacceptable when such a thing can be designed and 3D printed for far less. The biggest problem I have with this, aside from the 5-button interface, no airflow, RH%, WB, DP, etc. is that the small probe makes it more difficult than with a vane to find the strongest point of airflow. This means it takes even longer to test a fan and since every fan has a different max flow point, that means it’s always going to take longer. Additionally, sometimes when I’d find the strongest point it would peak and then drop down but other times it would remain steady at that spot. I’m not sure if this is a fluke or a problem with the unit or design, but it is, I feel, cause for doubt.
I emailed LonGwin a couple of days ago with questions about their cooler tester but I’m pretty sure it isn’t stand-alone, since it has neither display nor controls on it. However, I encountered TeraSeraph on LTT’s forum and he has devised a proof-of-concept cooler tester. I’m not sure how he measures the temperature. He also has a wind tunnel. You can see this conversation at https://linustechtips.com/topic/1513588-120mm-fan-comparison/. I’d love to hear your thoughts, and he probably would, too. His knowledge of the topic is much more advanced than mine, I believe.
How important do you feel it is to measure RH%, DP and WB in addition to ambient temperature? Our humidity can get very high in the depths of summer and I don’t have a way to control the environment in my home. Temperatures can exceed 32 for weeks or months at a time, although this summer has been mild so far. I’m considering either the Extech AN300 or AN310; I don’t THINK that there’s any reason to get one of the others from the 300 series, and these offer a 101.6 mm vane, which I feel is the best choice at this time, especially since they are as sensitive as the Reed, and accuracy of ±1.5% of reading + (59 ft/min or 0.3 m/s), which is better. What do you think?
I will watch that YTer as soon as I can. Thanks for that info!
I guess we have a misunderstanding. Static pressure is, of course, extremely important in fans. And even in the position of system fans (on grilles and dust filters), where its influence is often underestimated. I am only writing about two different approaches to analysing the static pressure in fans. We can talk about two different views.
The first view is the one where you measure the static pressure at zero airflow (i.e. in a perfectly sealed tunnel), where there will be some data at the output. The ones that are used to construct P/Q curves. There are a few things to be aware of. Firstly, that the measurements take place at zero airflow, which in practice does not occur due to any obstacle (the resistance of the environment is always lower, often significantly so). And secondly, that you measure without an obstacle, i.e. without the element that forms the resonant frequencies of sound by the airflow. This means that if you theoretically measure equal P/Q curves for the same noise level at x fan, in practice one fan may be quieter and one louder with a particular obstacle depending on how the selected obstacle affects the tonal peaks in which model.
And now we come to the second view, when you don’t measure the raw data of static pressure, but the airflow drop due to a realistic obstacle. In this case you are also concerned with what static pressure a fan has and what performance to expect in practice. A fan with a smaller airflow drop through a particular obstacle is likely to have a higher static pressure than one with a higher airflow drop. And these measurements also take into account how the obstacle changes the character of the sound. Moreover, you are no longer measuring in the unrealistic environment of zero airflow, but at the kind of environmental resistance that occurs in practice, in an ordinary computer. Of course, the resistance of the environment is also dependent on the configuration of the system fans and so on, but that is a topic that is not worth bothering you with at this time.
One more thing about the zero airflow to close it out. As the airflow through the measuring system/tunnel increases, the static pressure naturally decreases. There is a hole through which air escapes, like in a balloon. When the balloon is punctured, the static pressure on the balloon walls is naturally lower. So if you were to measure the static pressure in a leaky system, you would measure lower values than advertised by the fan manufacturers in the specifications.
You will need to delve deep into these topics to get relevant results. In my opinion, and now I don’t mean this in a bad way at all, you get too hung up on measuring devices at the expense of design features and knowledge of the basics, without which you can’t really move. I certainly don’t want to discourage you and on the contrary you have my support, as far as know-how and having more time are concerned, we can communicate for hours and hours internally, but… you really need to have control over the physical phenomena involved and look at the formulas from ThermalLeft. You will need them if the goal is to interpret the measured airflow values correctly. In principle, it is not complicated and you can create a spreadsheet calculator in which you enter only the input (the measured value on the anemometer in meters per second, for example). After entering all the variables, you then get the corresponding value in cubic units at the output.
Stable environmental conditions are, of course, the basis of all very precise measurements. Large fluctuations in air temperature, for example, can have an effect on the lubricant temperature in the bearings, which then determines its viscosity, which in turn has an effect on friction and the achieved fan speed. It always depends on how accurate you want to be with these measurements and of course there are some reasonable limits beyond which there is no significant distortion.
Extech AN300/AN310 will be a good choice, but again it depends on the environment you will use the anemometer in… in my opinion there are more suitable and unsuitable test environments than suitable and unsuitable measuring devices. Each measuring device should be chosen with regard to what and how you want to measure. Anyway, I would like to point out that these anemometers are also available with the NIST calibration protocol. We bought our AN300 without it, because the calibration according to the standard was done externally and even without it the instrument was extremely accurate in the used range. This is not necessarily a condition and some corrections may be necessary for another piece.
And as for what TeraSeraph writes… I confess that I don’t have time to read the whole discussion (I wouldn’t get anything done then), but I was put off right away by how he quite strongly claims that the circular frame on fan rotors deteriorates their acoustic properties. Arctic has added the frames to their newer fans for the very reason of knocking down tonal peaks. I’m not claiming that this is a bulletproof solution that completely eliminates vibration, but in most cases it will suppress those that stimulate resonant frequencies. We have tested several fans with these rotor frames and you can see their spectrograms.
Thank you very much! I’m going to have to reread and ponder what you’ve written. If I wanted to use that equation in a spreadsheet, could you tell me what to enter as the formula? Math really is a struggle for me.
Apparently, TS has studied a lot about airplane engines and props, and that has affected their understanding of computer fans. They have also made a proof-of-concept CPU cooler tester which is really just two resistors under a metal plate and powered by a bench power supply. I don’t know how they measure temperatures, though.
In my testing, I am not measuring airflow – I’m looking at the temperatures achieved. If you’re curious, I’ve started sharing my results at https://www.bleepingcomputer.com/forums/t/786522/fan-comparison-on-noctua-nh-u12a-a12x25-t30-mobius-oc-ml120-sp120-tpcea/. I hope to have the rest of it (two more charts) typed in by Friday.
Sorry for taking up so much of your valuable time – I really appreciate it!
Hmmm…For some reason, that link to that YouTuber, which worked yesterday, is dead today.
And now it’s working again! LOL!
No worries, please take your time. I will wait. 🙂
While I am waiting, I wanted to register here, but it said I needed JS and cookies. I am using Firefox and I don’t know why it wouldn’t work since I had no extensions.
Also, I need to find an external AC stand-alone fan controller. Are you aware of any good 110V FCs?
I will find out from the webmaster what the problem might be (so far nobody has reported problems of this type during registration). I ask for a moment of patience. 🙂
No worries, I resolved it somehow.
Have you come to a point where you can respond as you intended? I’m itching with curiosity! 🙂
Yes, you will find the promised response above. If something remains unanswered or is unclear, let us know and we will get back to you. Again, I can’t guarantee that I’ll get to it right away, but nothing ever goes unanswered. 🙂
I just wanted to update you that, although the Extech AN300 was accurate and it made it very easy to find the best flow with that 4″ vane, it isn’t good for low air movement because it only offers 2 decimal places for velocity, one for flow, and none to set the area. The blades are flat, slightly textured and set at a 45-degree angle, so you can measure from either side but the thermistor is in the hub on the back side. I didn’t find it particularly user friendly since, like some other brands, it had poor labeling despite ample space, poor use of the display, and only 4 buttons where 6 were possible. Ultimately, though, the lack of decimal places and sensitivity killed its usefulness because it couldn’t register the slowest flow at the end of my 2-foot tunnel. Some people have advised me that I need to have tunnels that match the size of the fans. I chose a larger one because I was trying to reduce laminar flow affecting flow. I understand that affects the pressure but, do you think it’s okay that my tunnel is that large? If I shape it like a double-sided funnel, the choke point will interfere with flow, create more turbulence and resistance, and negatively impact results. Also, it was suggested that my anemometer should not be against the back of the tunnel but a short distance from it so it doesn’t interfere with the flow, and not to put it inside the tunnel at all because it’ll interfere with the flow. What do you think?
I’ve got some material I’m going to use to straighten the flow, I just have to cut it and make sure it won’t collapse in the tunnel.
Thanks for your input!
Along the route of the tunnel, your pressure is obviously dropping significantly, which shouldn’t be the case. It is not so much a “low resolution problem” of the anemometer (AN300), but a deficiency of the measuring tunnel. Two decimal places for wind speed sensing are fine, you don’t need more, it doesn’t increase the resolution or the accuracy of the measurement. The latter depends on other things than the technical possibilities of the anemometer.
“I chose a larger one because I was trying to reduce laminar flow affecting flow.” Laminar flow, on the contrary, is a requirement. Turbulent flow is what needs to be reduced when measuring airflow. You will measure a lower/distorted airflow due to it.
I honestly don’t know how I could advise you in the scope of a comment so as to remove the many holes in reasoning that come from the lack of knowledge. Don’t get me wrong, I am very much rooting for you, but I also know that your current level of knowledge is not enough to properly understand many things and draw relevant conclusions. Fan tests are extremely difficult to get the right results and also to interpret them correctly. Before we embarked on anything, it was preceded by years of study and consultation with people with a high level of education in related fields with theoretical knowledge, but also from practical experience. I also wrote in one of the articles a long time ago that although we knew how our fan tests should look like, but we didn’t have full control of the properties of the measuring environment (so we had to tune it with someone who “understands it more”…). And believe me, it is extremely difficult to build something like that. There’s so much you may not realize… because in short, you need a certain, and quite deep, insight into some areas of physics.
Glenn, I watch almost every video of yours, where you somehow discuss thematic things about fans or anemometers… probably mainly because I’m fascinated by your enthusiasm and passion for the cause, it’s very inspiring to me. At the same time, I have to say that you often start from wrong assumptions and… I don’t know exactly how to write this, so as not to discourage you from further work or to make you angry… in your understanding of certain phenomena you have, in short, certain gaps and you draw from them many erroneous conclusions. This, of course, also follows from the fact that you don’t like mathematics and physics, as you yourself note. Without studying some things or at least approaching someone who is lecturing on fluid dynamics in a university, as a “training” to fill in the missing basics more quickly, you will not get to the relevant results, unfortunately.
I was thinking that sometime, when there is time, we could talk about these things, make a call. That would be useful for you (in the form of a question and answer with an explanation you would understand some things faster) and for me (maybe finally a space to at least work on my English, which is again my very weak side :)).
Thank you for the feedback, L’ubomir. I appreciate it. I’m not angry with you or discouraged. People have said much harsher things to me already, and they didn’t look at anything I’d done. Thank you so much for supporting me!
I would like to know about the things where I have drawn the wrong conclusions. I would like to be good at maths but, frankly, although I got high scores in school to the point that my classmates decided I must be mathematically gifted, it was only because I worked very hard outside class to make sure I understood what was being taught. This continued through advanced maths, and I kept my grades high, often completing tests before my classmates. However, the higher I went, the more I would forget after testing. I realized that I had reached an intellectual boundary in maths and opted not to go to pre-calculus or beyond. It’s not a dislike of maths, as you suggested, but a limitation I have. Believe me, I would much rather be able to do maths easily! Now, I’ve forgotten almost everything beyond arithmetic, and I have to do that on paper, with a calculator or in a program because I make too many mistakes otherwise. This deficiency caused me to abandon my desire to be a chemist and, later, to learn circuitry. I enjoyed both subjects in school, but my weakness hounded me.
Yes, there is much I do not know, and it’s likely that some of that I will never grasp or will always struggle with. I strive to learn and improve anyways.
I understand what you mean about my wind tunnel being the problem – others with more knowledge than me said that between the diameter and the lack of a flow straightener, I cannot get correct readings. As I am waiting for the replacement anemometers to come in, I have set aside adding the straightener to focus on my U12A testing.
As you have watched most of my videos, you likely already understand the following. Some people have objected to my U12A methodology because I’m not trying to lock down all the variables, nor am I aiming at producing lab-level results. I understand the value of those results. I don’t have the space, money, equipment or knowledge, let alone skills, to achieve either of those goals. Instead, I look to basic principles of scientific testing, such as always using the same equipment, the same methods (consistency, in other words) and recording and looking at the data from different angles. In order to reduce the risk, and because I cannot afford to buy 3 of every fan (an unfortunate reality), I run each load test 3 times in order to find out the temperatures achieved with a fan mounted on the right/left of the U12A, as well as tracking the room temperature so I know the delta T, and RPM.
I have, during social events, met 3 or 4 engineers and talked with them in a non-leading way about what I’m trying to achieve, and the challenges of measuring airflow and static pressure. Each of them, to my surprise, told me that I didn’t need to measure SP (since it’s so difficult to do with PC fans without very special equipment that I cannot afford) and that I could infer the SP by measuring the heat dissipation, which is what I’m doing. I explained what I’m doing and they agreed that this could achieve the goal that I have set for myself – which is to be able to rank the fans.
One of the major challenges I perceive in fan testing relates to both RPM and the reliance on noise-normalization. Since every person is different in terms of the sounds and volume that will bother them, and very few testers look at even the basics of it because it’s so complex, I cannot blame testers for not addressing this. It really is hard to do any justice to that topic because some people are bothered (physiologically and/or psychologically) by noise. Additionally, some fans get eliminated from comparative tests because they cannot achieve the required RPM or dBA, or the level is lowered such that the high ends of the stronger fans get ignored – neither approach is optimal. Do you agree? I have not mentioned this in my videos, but I plan on breaking fans down into different classes based on the U12A performance and, later, noise and airflow, too. By breaking fans up into different levels – and I would love to know your suggestions on how to best do so – I hope to provide a useful and easily understood system to consumers.
One thing that irks me about some testers (ignoring the shills and frauds) is that they continually focus on certain brands and models, and ignore the many other options out there, many of which are not cheap. That’s part of why I have fans from 82 different brands – 1 to 18 models per brand. Because I believe that PC fans are vastly overpriced, I am focusing on (almost exclusively) lower-cost fans, understanding that what may be expensive here might very well be cheap elsewhere, and vice versa. Later, I will add in the expensive fans, assuming I can afford to do so, although I’ll probably ignore any fan over a certain price.
Someday, I will test coolers, but I’ll have to figure out a way to simulate the unbalanced heat-load of those that have chiplets – probably by using several resistors, which I can control individually, under the plate. That will have to wait and may never come to fruition.
I fully acknowledge that my weaknesses may be insurmountable without a team. While I would think it nice to be respected within the testing community, a lot of people are very rigorous and determined to do things in the most stringent ways, so I must satisfy myself with doing the best I can and hope that, at the very least, it will help other people even if my peers (if I may be so presumptive to say that) have poor regard for my methologies and results. I know that I will never achieve the respect of leaders in the field like you, HW Busters, Gamers Nexus, Kit Guru Tech and so on.
I would love to talk to you, to learn from you, and to help you with your English (directly or indirectly). I really hope to learn where I have drawn the wrong conclusions. Thank you, again!
When I think about it, you can probably have quite a lot of chaos in your head from the different tips and advice (often perhaps even contradictory). In order not to make it even bigger, I’ll just write a few simple notes.
1) I wouldn’t talk about what each tunnel must or must not contain. It depends on overall aerodynamics and how the fan is measured. For example, the flow straightener in some tunnels may be useful, in others it may not. Personally, I consider it an element that unnecessarily increases the resistance of the tunnel itself, which is undesirable for airflow measurement.
2) That “everything is tested under the same conditions and will therefore have some informative value” is a rather tricky conclusion, especially for fans. It is not necessarily the case that every fan will be equally affected by, say, an inappropriate methodology. Due to the tunnel characteristics, the results of some fans may be more distorted than others. This means that the ratio comparison of better/worse and by roughly how much will not be perfectly valid.
Following point number two, there are many different conclusions on the same fans, which means that there is a mistake somewhere. Quite crazy things are presented by the authors of Hardware Cannucks, where some results technically cannot happen even in that inappropriate environment. Based on the fact that they never published the test tunnel (although they promised photos of it two years ago and even then I asked for them several times…) and from the description under the videos they removed even the strange document on the methodology, I assume that these are tailor-made results, which are meant to promote the sales of a particular fan. Well, I hope I’m wrong…
… I don’t want to discuss in detail why many authors come to different conclusions, but often you can see just rookie mistakes. Note for example Majors Geek, who in older videos reports much higher airflow for the same fans than in the measurements of later videos. I suppose that this is due to initially incorrect processing of the anemometer data and here we come to the Bernoulli equation again. Although they are very skilled when it comes to 3D printing and they can build great things, they still have some room for improvement, let’s say, in the actual testing of fans.
It is difficult with me though and I have reservations about almost all testing methodologies. And TechPowerUp is no exception. I won’t elaborate on it, so it doesn’t sound too offensive (it’s true that from the “competition” it probably wouldn’t be appropriate), but the generic tunnel (probably created by Corsair? I’ve seen it also in some Gamers Nexus videos…) is far from being able to talk about some accurate results of measured airflow. Also Aris (HW Busters) with Longwin LW-9266 is fine, he has a great device on his hands, but my opinion is that he can’t get too much useful data from these measurements. Anyway, he is, of course, mainly a specialist in power supply topics and he has fans as a side job.
It is always good when there is some cross-verification of results across methodologies, as is the case, for example, with our tests and the Quasarzone tests (whether ThermalLeft’s or QM오즈’s tests). But even here it can happen that some fans can be positioned relatively differently. Especially in methodologies where the test is performed at normalised noise levels. Their determination depends very much on from what distance, from what angle, with what noise meter and in what environment the tester measures the noise. Depending on this, some fan sound frequencies may have a greater and others a lesser contribution to the resulting fan setting. It would be another thing if the noise would be measured according to a standard, but such a procedure for a detailed comparison does not make much sense IMO, because it is based on too large a distance (1m), at which the resolution is significantly reduced and the differences of, for example, small motor sounds or bearing sounds, which differentiate the excellent fans from the very good ones, are lost.
I believe that we will discuss technical aspects of the design of the test tunnel (or the test environment as a whole) sooner or later in the context of a call. I would like to propose a date for tomorrow, but unfortunately I have a lot of work to do (and you’ll certainly have the same problem…) and I know how easy it is to “get into trouble” with such debates (time always goes faster… somehow :)). So for now I keep my fingers crossed, ponder, explore, try and in half a year you will be on a different level again. Just don’t get discouraged and especially not by people on forums, who tend to know everything the best even without any work behind them, from which they could gain experience. Whatever mistakes you are committing now, I know you are on the right track, because you really mean it with those fans, you just haven’t mastered the optimum technique yet. But it will come one day, you just have to persevere, have patience, study a little and sometime early next year maybe there will be the space for some of those consultations… we’ll see. Anyway, hang in there!
Oh dang, I’ve gone off again and in a completely different direction than I originally planned. 🙂
L’ubomir, thank you for the response. I haven’t been watching the testers for very long, but I have noticed some things that sometimes make me wonder if some of the more accepted ones might not sometimes compromise their integrity. That’s all I’ll say on that topic, other than that I have no wish to do so, even though this is costing me enough money that my kid thinks I’m crazy. I just got the Infurider YF-6000GH anemometer today, and I should get the other one soon. I haven’t had time to test it and it’s bed-time now, but I did notice the blades aren’t properly balanced, which I learned from TeraSeraph can be fixed with careful application of something like nail polish. If it passes my accuracy testing, I’ll be quite pleased as it has better resolution than any of the previous ones.The other also has better resolution. I looked at a few others but eliminated them because of custom software – I distrust that and want the data to go into my spreadsheet.
I have come to wonder if it would be best to just start publishing what results I have from the U12A testing I’ve done. I have testing in triplicate for the Noctua NF-A12x25, and the DeepCool FK120, and I’m almost done with the Akasa Vegas R7.
I wonder why I never see reviews of Akasa, BlackNoise (NoiseBlocker) and some other brands.
I agree that 1m is too far away for sound testing – most people are closer than that to their PC. I have sent off another sketch and explanation to the contractor to make my anechoic box. I hope this time his brains are working so he can build it. He seems somewhat stupid. It will be (sorry, inches) 33×13.5×12.5 internally, padded inside with sound-dampening material, and I’ll mount fans one by one to the ThermalTake Core V1 and test sound from about 200mm away – I have to experiment to find the right balance between sensitivity and what most people will actually here. TeraSeraph and another (supposedly an engineer who worked for the government), Micha_Vulpes, do much more sensitive testing because they are highly sensitive to odd noises. Micha, for example, hates Noctua because there is a frequency that really irritates her. She sent me a Noctua F14 that irritated her – I hear nothing bad. I still need to find a way to power the fans without using my PC. Someone about an hour away has offered some help with that but is still trying to figure it out. We’ll see if that produces what I need, which is an independent power supply with a display showing volts and watts or amps, and preferably RPM so I don’t need to buy a tachometer. I’ve got a couple of controllers that we might be able to use – time will tell.
I am at that point in my life where I am tired of being discouraged by people, and so if someone criticizes me but doesn’t provide helpful input, I ignore them. Micha is one such person. I asked for feedback and she was really rude and unhelpful.
The best free times for me are Fridays and Saturdays, although not this weekend.
I was looking at how to calculate the heat dissipation coefficient but the math, as well as some of the data needed, is beyond me. I assume it must be physics because I’ve never seen it before. I would need a formula for a spreadsheet, but then I’d need the data for the many variables in the formula, and I don’t know how to do that. Sigh. Perhaps I will be stuck inferring until I can have enough financial strength to have a team. That is hard if I don’t prostitute myself to manufacturers and vendors, but I will not do that.
I have come to realize that the best way to deal with projects of this magnitude is to break them down into small enough parts that they don’t trigger my anxiety.
BTW, your written English is quite excellent!
Why are there fewer reviews of Akasa or NoiseBlocker components?
There are several reasons. One of them is that those brands have relatively weaker marketing and there is less awareness of them, their tests do not attract as many people. Unless it’s something extremely unusual… when you release a test of anything from Arctic or Noctua, you can be sure that the test readership will be several times higher than the Akasa or NoiseBlocker test. This will also result in lower third party advertising revenue for you. And who wants to be paid less for the same effort? There are few such madmen who do it in the name of exploring the unknown. I believe we are in that category. If you notice, we don’t go overboard with the leading brands. In our current database we even have the same number of Akasa fans (2) as Noctua (2). By the way, for a very long time we have also had NoiseBlocker fans in our testlab, I just can’t get to them, there is always something “more important”… But this will be the year when the M12-PS tests are guaranteed to come out. 🙂
There is also a disproportion in the ratio of tests of cheap things to expensive ones. You don’t have to go far for an explanation here either. The vast majority of tests are commercial ones and there are higher margins on the more expensive stuff, and that means more profit for the test author, because “there is something” to pay his fee from. When it is not done by the manufacturer’s representative himself in the context of paid advertising, there is also a commission model from the units sold in stores. And, of course, from the sale of a hundred pieces of expensive, 700-euro motherboards, there is more in margins than from a fivefold quantity of cheap, 120-euro boards. We know that this is the way it is, but those who are passionate about the professional side of things will be able to resist this temptation. I believe that we are a good example of this, because we often test very cheap things, whether it’s boards, fans or 3 euro SSD coolers and even relatively unknown… have you heard of the brand Axagon? It is possible that you have, but I assume that more people know Thermalright when it comes to SSD coolers.
We are currently preparing a methodology to test external SSD boxes, which similarly won’t be sold by a brand and aren’t high margin items either. We consider it useful anyway, since tests of this type are missing on the Internet.
Sometimes I have a moment of weakness in which I feel very sorry for the way the technology media market has been transformed. Namely into a hardcore business built on click-bait, unfair damage (to companies and customers… by misleading), where it is all about the highest personal benefit at any cost. It is getting harder and harder to name any professional hardware media. There are always smart individuals, but serious HW media are probably even fewer than those tests of cheap fans from unknown manufacturers. 🙂
Fully agree on your comments on Hardware Canucks and HW Busters. The former seems good in that they test airflow at various noise levels, but the results are often very strange and do not align with other reviews. The later has good equipment but the methodology is simply not there yet.
L’ubomir, thank you. I believe that your explanation is spot-on, as the British say.
One concern about Aris is that, although he is clearly trained and extremely knowledgeable, there is something about his demeanor – a certain smugness – that makes me a bit concerned. I haven’t watch enough Hardware Canucks to really weigh in on the quality of their work. Do you have any thoughts on Kit Guru Tech, or Tech Notice? What about Major Hardware and derBauer?
No, I haven’t heard of Axagon. But, then, I have put no time into looking at SSD coolers since it doesn’t really seem that it is an urgent need for most people, or even just me. What will you be measuring other than temperature and speed? There’s a couple in, I think, northern Europe, that has tested a lot of SSDs, but I cannot think of their YouTube channel or webpage. The wife does the presenting. I’m ambivalent about them.
Despite the heat driving into the 90s F here, my U12A and 10 fans have been very successful in keeping the temps reasonable, even during testing with Speed Way, Time Spy Extreme, Superposition, Heaven, Valley, etc. Only prime95 managed to cause a problem by heating things up so much that my ethernet got knocked out until I rebooted – I had not expected that!
I hope that you will get to your BlackNoise tests this year – I cannot say for certain as I’ve only tested one, but I think they deserve at least SOME attention. Like you, I have chosen a lot of brands that are not commonly recommended and aren’t expensive.
I have just received a fan from a company I’ve never heard of (I bought it, I mean), and it seems to be the only one they make. However, if the published stats are correct (no testers have reviewed it, yet), it is going to make some other fans look weak, so I’m disrupting my planned sequence of testing to get this one out early. From looking at their website, it seems they’ve been more focused on mining and similar than consumer needs, but I would love to discover that their fan will disrupt the market of shills.
I’m afraid that I must go to work now. I look forward to hearing your thoughts on those testers I asked of.
Please don’t ask me to judge individual YouTubers. Again, I don’t watch that many of them, but when I do come across something, I’m usually not at all comfortable with the fact that some things are allowed to happen, and what’s worse, that people adopt them as “truth”.
Recently I was also very disappointed by der8bauer, who already behaves like more of a businessman than an expert. The test of 13 pieces of Ryzen 7600 processors was quite irresponsible, given the uncontrolled conditions during the tests. The variance of the differences was not determined by the actual difference between the processors, but by the differences in conditions during testing. It’s awful to see that he was testing it just like that on a box and it’s clear to me that many people don’t realize it, but I personally know exactly what happens with the selected processors (of graphics cards) in case of a failure of even just one system fan in the tunnel. I find it horrible that he can present it like that, but it’s business, and that’s what the biggest youtubers have in common. They have to do things according to a formula to appeal to the masses. In order to be heroes, they often just need to rant about everything without seeing things from a broader perspective.
We probably don’t need to talk about any expertise at all, it’s very rare on YT, it’s typically reserved to small creators that almost nobody knows. I don’t want to develop this debate further, because someone might get the impression that I’m self-absorbed, which is not true… I can really appreciate the qualities of many people, but I don’t see such people among famous youtubers. Anyway, I would cut it off here, we are getting into a heavy off-topic, which has nothing to do with the BeQuiet! Silent Wings 4 Pro fan test and nothing to do with testing fans as such. 🙂
Is there a more appropriate way for us to continue communicating?
Of course, you can email me at any time at samak@hwcooling.net. I do not promise that I will always respond immediately, but this way we can be in touch. But of course I will be glad if you don’t forget to comment on the web. Though it will probably be nice if we don’t get into a pub shouting match. These are sometimes good for relaxation, but some things are probably enough to discuss internally and not to discourage others who come to the discussion for things related to the topic of the article. Sometimes I “encourage” such diversions myself and then I feel a bit sorry about it, oh well. The aim of HWCooling was, is and will be to filter out bullshit and hearsay and to focus only on the essence of the matter devoid of subjective perceptions, emotions etc (there is enough of that everywhere, excess). In the articles, I believe, we manage to do it, but discussions are also a part of (the articles).
BTW, if it makes you feel better, I just got some SWP4 (BL098) and PW2 (BL039/81/82). I’m also waiting for the other SWP4, which was delayed. I tested them to make sure they were ok and I was impressed by how the blade ripple helps to spread the airflow over more of the cone. There aren’t many fans that try to do that.
Hi Ľubomír, thanks for the review.
Why aren’t there any values for the BeQuiet! Silent Wings Pro 4 (BL099) on the “Static pressure through a nylon filter” results page?
Hello, Ben,
The results are missing due to the collision of the rotor with nylon filters without a reinforced centre (i.e. with such filters where the surface is made only of a mesh). The mutual contact/rubbing significantly increases the noise level and it does not make much sense to use and therefore to test (especially when fans are tuned to standardized noise levels). Therefore, we do not do measurements in such cases and for the same reason with the nylon filter, the 140 mm SWP4 also lacks airflow results, which are more practical measurements to analyze how the cooling performance is likely to decrease due to the dust filter. The “Static pressure through a nylon filter” results are more, let’s say, experimental. It is possible to observe certain correlations based on them, but as far as which fan is more effective with a nylon dust filter for system cooling, the airflow results are the key.
Hi, really like your fan testing.
I have a question about the pull/push ratio. Does 3,000 mean 3x or how should i look at these numbers?
Also is the difference between 1.000 and 2.000 the same as between 2.000 and 3.000, or does the effectives slow down the higher or lower the number gets away from the 1,000-base number?
I’m asking because i have an ITX build im currently working on with 2x 280 rads, and putting my SW4 Pro in pull would be so much easier when it comes to building the loop, so i wanted to clarify any questions before i make my final decision.
It is a more complex topic, for which we plan to write a separate article sooner or later.
Do not read this as meaning that in one or the other orientation the airflow will be multiplied by the appropriate coefficient. It should be understood that what is being fed into the ratio here are static pressure values that are measured at zero airflow with very high environmental resistance. It could be written that these ratios represent a worst case situation, which does not occur in practice. You can assume that the coefficient indicates in which orientation the airflow could be higher or lower in practice, but always only by a little. It depends on the resistance of the application environment. At zero resistance/static pressure, even the largest differences, which are presented in the graphs, will be at around 1,000. If you measure the air flow correctly, at any orientation in a sufficiently laminar location, you will get comparable results.
That’s that for now, until these things will be discussed in detail in the framework of the mentioned thematic article. If something is unclear to you, feel free to ask.
Thanks for your answer, really helped to put things into perspective. I saw a simular test from igorslab a few years ago, where they testet push pull with the same fans, and it seemed to not really change much. Now the fan used was from noctua, and it is obviously just one test, so i was a bit unsure after i saw the results you got here. I guess in the end it isn’t that big of a deal.
And just to tell you how it will look like. As i said i’m using the meshroom s from SSUPD, which has no dustfilters or closed up panels. It’s close to an open test bench i would say. I saw videos where the guy used 1x 280mm radiator by 36mm for his 5950X and a 3090, and they got really good temps with it.
I got 2x 280 HPE30 from Alphacool with the SW4P, because i’ve read that radiator has a really good performance even on lower RPM, but idk how restrictiv it is. I was looking for an ITX PC with efficent cooling while staying silent enough to not disturb while i work or play games with my soundbar on instead of headphones.
Maybe you do readiator test too? And know how good it is, or what a better alternativ would’ve been? I’m new to your side, so idk all the things you test here yet 🙂
And one more question, will you test the new Noctua 140mm fan when it hopefully soon comes out? I would love to know how much better than the SW4 it could be.
I think you’ll be surprised by how restrictive the mesh panels are, it’s definitely far from open test bench. In the nylon filter test for example, significant airflow is already lost (and nylon filters are one of the lower resistance meshes already). That said, the Meshroom S does have better airflow than most cases.
The HPE30 has a FPI of 18, so compared to the “thinner radiator” tested here (22 FPI) is should have slightly less resistance. I think in your case though, whether push or pull is better will mainly come from the overall airflow of the case instead of on the fan-radiator level. I think running all fans as exhaust without the use of any case fans is very feasible in your setup.
Anyway, I believe 2x 280mm should be plenty for running any combination of hardware at low fan speeds.
That would make sence, as the review i was reading about the HPE30 said exactly that, but someone in a forum i was asking about some advise said it would be worse because it has 2 more pipes compaired to other 30mm radiators. I told him about the test i saw and he never replyed, so i guess he had nothing to add there 🙂
I thought about all fans in exhaust at first, but since then i had a lot of time to see reviews of the Meshroom S and obviously the meshlicious, and i saw a lot of people doing intake only and even pull on that, and the results are really good that way. After all that ensures that the absolut coolest air is used to cool the PC down. But since i use 2 radiators instead of only 1 (they had a 36mm thick one though). I chose to get Noctuas 120mm low profil fan for the top(which i plan to run at a fixed 600RPM), so any hot air that might be traped somewhere in the case can get out threw the top. I even have most of the pipes and fittings running at the bottom so the fan can get air out without to much in the way, just in case. This should give me the best airflow and cooling at the same time, if pull is about as good as push.
I also found a good artikel for push vs pull, they even used a fan on the list here. It is the SW3, and the used a standard AIO Radiator, but it was a test for 120mm fans as they used a 240 Radiator. But the results are good and shouls apply to 140mm fans as well. There was literally no difference in cooling or noise with them, so there shouldnt be to much difference for the SW4P nether i hope😅
So thanks for your reply always nice to have a few more opinions about it 🙂
Here are the videos for airflow and push/pull i wrote about. You might’ve seen them already.
https://www.youtube.com/watch?app=desktop&v=DeBxEb_kcxE
https://www.youtube.com/watch?v=OznckChehgw
We do not test radiators and we do not plan to.
The upcoming 140mm fans, of course, will be in the tests when they come out. In the meantime, next week you can take a look at how much “better” the Thermaltake Toughfan 14 Pro is compared to the SWP4. 🙂
Great, i’m really interessed in the new Noctua Fan. I’ll definitly look into new fan reviews here, just to see how they performe.
I just wrote a longer Post about all, but i guess it wasn’t going through…
Anyway, here is the most important thing. I thought about all exhaust as well, until i saw the videos down below. So, i took their approach to it, and just added a Noctua 120mm slim fan to the top, so any hot air that might be stuck in the case can go out the top.
Thanks for your reply, it is always nice to get some more opinions in to consider 🙂
https://www.youtube.com/watch?app=desktop&v=DeBxEb_kcxE
https://www.youtube.com/watch?v=OznckChehgw
Comments with links are often “for moderation” and we have to approve them manually before they can be published. I don’t know how exactly the antispam filter works (some posts are allowed even without the approval process), but if you don’t see the comment, you already know what it is. The filter should be more benevolent to registered users, but there are some restrictions there as well. We definitely want to take a closer look at it, try to optimize it somehow to make everything as convenient as possible for the discussants, but somehow we still don’t have time to do that.
Yeah i found that out after this comment was send and didn’t appear 🙂 Idk, maybe you can remove it as it’s somewhat useless, now i know how it works here so all good.
I think it would be enough if you just have something like a little warning about it near the comment, or as a little pop-up after people click on post comment, the first time they comment something. Just so everyone knows why it isn’t showing up instantly.
The warning when a comment is not displayed (because of the URL and the need for moderation) is a good idea. We’ll see how the webmaster will be able to implement it. Anyway, I’m writing it down. Thanks! 🙂